How do I reinstall the Solar desktop shortcuts?

If Solar is installed, but the shortcuts have disappeared:

  • Have the user remove all Solar desktop shortcuts
  • Control Panel -> Java
  • On the “General” tab, find “Temporary Internet Files”, click “View…”
  • Right-click on Solar -> Uninstall Shortcuts
  • Right-click on Solar again -> Install Shortcuts

To give users a direct link from which to install or launch Solar, you may send a hyperlink or create shortcut directly to the web start URL. To obtain this URL, right-click on the Click Here to Install Solar Eclipse link and copy the URL. The URL should be similar to to following:

http://172.17.188.36:2080/SolarInstallService.jnlp
Reinstall Solar

Basic Reinstall Procedure

If you’re having problems with Solar, it may be worthwhile to clear your cached Solar files and reinstall from the web-start link.

  • Navigate to the Control Panel
  • Select Java
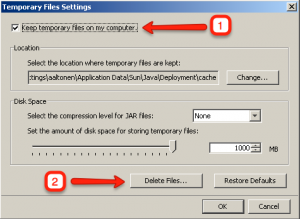
  • From the Java Control Panel, click the “Settings…” button under the Temporary Internet Files section
  • Verify that Keep temporary files on my computer is checked
  • Choose Delete files
  • Reinstall Solar using the Click Here to Install Solar link (see also: How do I install the Solar client?)

View a step-by-step screencast of this process:

Advanced Reinstall Procedure

The following procedure should be used if the above basic procedure doesn’t work:

NOTE: If you are using Windows 7, REDUCE UAC (USER ACCESS CONTROL) to the minimum setting before attempting to install solar.  You may set UAC back to your desired level after solar has been installed. Ref: http://windows.microsoft.com/en-US/windows7/products/features/user-account-control

  • From the Start menu, select Run
    • For Windows XP, paste/type and run: %APPDATA%
    • For Windows 7, paste/type and run: %USERPROFILE%\AppData\LocalLow
  • In the Explorer window that opens, delete the Sun folder
  • Reinstall Solar using the Click Here to Install Solar link

If Solar does not function after performing the above steps:

  • Navigate to the Control Panel
  • Uninstall all Java Runtime Environments
  • Reboot the computer
  • Install only the Java Runtime Environment available on the Solar web start page

If Solar still does not function after performing the above steps:

  • Log in as Local Admin on the Desktop
  • Remove the Windows User Profile where the SOLAR issues are occurring.
  • Reboot, Log back in as that user, then Reinstall SOLAR

How do I install the Solar client?

The Solar client is installed directly from your application server using Java. The only prerequisite is Java 6, which you can find on the web start page below.

To access the server, you will need to know the correct web start URL to enter in your web browser. To assemble this, you will need to know two pieces of information:

The installation URL will look similar to: http://192.168.0.100:2080/

To install Solar, navigate to the URL using the web browser of your choice and click the Click Here to Install Solar Eclipse button.

If you receive an error, make sure that Java 6 is installed. If not, use the Click Here to Install Java link to install the appropriate version of Java. You will need administrator privileges to install Java, but not Solar.

Solar is a Java Webstart application, so it is installed on a per-user basis, not a per-workstation basis like Eterm. The benefit is that all users, even non-administrator users, can install Solar. The downside is that you cannot load Solar one time for all users of the workstation. You may, however, create a normal Windows shortcut to the Solar URL, which will allow users to click a single link to launch Solar, regardless of whether it was previously installed or not.

To give users a direct link from which to install or launch Solar, you may send a hyperlink or create shortcut directly to the web start URL. To obtain this URL, right-click on the Click Here to Install Solar Eclipse link and copy the URL. The URL should be similar to to following:

http://172.17.188.36:2080/SolarInstallService.jnlp

How do the Solar and Eterm clients communicate with the server?

The Eterm (TUI) client communicates with the UniVerse database server via the telnet protocol (TCP port 23). It uses a proprietary implementation of the ViewPoint terminal type to offer additional features in Eclipse (send/receive files, drag/drop, hyperlinks, etc.).

The Solar (GUI) client communicates with the JBoss application server via the HTTP and HTTPS protocols (default TCP ports 2080 and 2443). It is deployed using Java Web Start.

In both cases, the business logic is performed on the database and application servers, not in the client installed on each workstation.

Eclipse Network Utilization

We are often asked how much bandwidth is used by Eclipse for planning new deployments. Here are some guidelines for estimating the network utilization of Eclipse users based on real-world data we’ve gathered from existing Eclipse customers:

  • Solar customers: 3 KB/s (24 kbps) per user
  • Eterm customers: 1 KB/s (8 kbps) per user

As you can see, the bandwidth requirements for Eclipse are quite low, but it’s important to take into consideration that users’ Internet usage is not limited to Eclipse, and Eclipse performance will suffer if the software has to fight for bandwidth being used for other means (i.e. streaming video and audio, file sharing, etc.). As such, we recommend prioritizing the following protocols used by Eclipse through QoS whenever possible:

  • The Eterm client communicates using the telnet protocol (TCP port 23).
  • The Solar client communicates using a proprietary web service protocol (TCP ports 2080 and 2443).
  • The Eclipse signature capture and document imaging processes communicate over standard Microsoft file sharing protocols.
  • The Eclipse printing processes communicate over standard Windows and UNIX printer ports (i.e. socket, LPD, etc.).

During the initial Solar client installation and after each Eclipse “point” upgrade, the Solar client will perform a one-time download of approximately 20 MB of data. For branches with large numbers of users, this can cause a temporary spike in bandwidth consumption when a large number of users launch the new version of Solar for the first time.

For analyzing your users’ unique usage patterns, we recommend using your network hardware’s built-in tools bandwidth utilization monitoring, or by running Wireshark on a workstation.