Overview
Performing routine backups of the data insure the data can be recovered in the event of a failure.This document will provide details regarding backup check procedures to ensure you have a valid data set to recover from if required. This guide cover the snapshot, rsync and CrashPlan backup option used by ABS Online Backup.
For customers concerned about their backup status, Epicor provides an optional backup-monitoring service, which consists of backup engineers reviewing the system status and backup logs in detail, every business day and notifying you of issues if they occur. If you’re interested in this service, please contact your Epicor account manager for more information.
How Eclipse Data Backups Work
The Eclipse database consists of several thousand files constantly changing. In order to get a good successful full backup, all files must be backed up while no one is on the system and no data is changing. In many cases, it is very difficult to get everyone off the system to back it up while there is no activity, so instead, we create a snapshot of the data (which is basically freezing the data at a specific point in time), which allows the live data to continue to be changed while the snapshot data remains the same.
The snapshot feature is part of the Linux operating system. Once we have this “frozen” data we can then utilize backup software (rsync, CrashPlan, or some other method) to backup the data.
Validating a Successful Backup
A good backup on a Linux server would require a successful snapshot of the data as described above, then having the backup software (e.g. rsync, CrashPlan) backup all files successfully before the next snapshot occurs. These are two independent processes that run (snapshot and the backup) which do not know about each other, but must be in sync with each other in order to have a successful backup.
Snapshot is similar to a photograph of the data and directory structure. Snapshots are taken of the Eclipse database and files. The snapshot process only takes a few seconds to run.
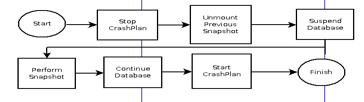
Figure 1: Snapshot Process Flow
Figure 1 shows the Snapshot process flow.
The four main aspects of the snapshot to verify are:
- Date/Time the snapshot ran
- Was the snapshot successful?
- Did the snapshot run out of room?
- When did the next snapshot occur?
Verify the snapshot date and time and whether or not the snapshot was successful
- Open a terminal session (e.g. PuTTY, or shell out of Eterm TCL)
- Type: less /tmp/snapsave.log
- While viewing the file
- Ctrl-D will scroll down a half a page at a time
- Ctrl-B will scroll up a page at a time
- Shift-G to jump to the bottom of the file
- Arrow keys to scroll up/down.
- :q! will quit
- This file contains a history of the last few snapshots that have been run on the system.
- Press Shift-G to jump to the end of the file to display information on the last snapshot to display information on the last snapshot that ran
- You are now looking at the end of the last snapshot.
- Figure 5 shows a successful snapshot.
- Verify there is a currently mounted /snap file system shown for each /u2 file system (you may need to scroll up one or two pages to see this info.)
- Note the date.time the snapshot was (i.e.If the snapshot ran at 6pm on 5-14-2011 you will see the snapshot for the u2 file system listed as: /snap/20110514.1800/u2. See Figure 2)
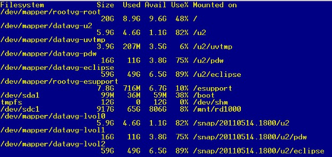
Figure 2: Verification of Snapshot files and date
- If you would like to see more details on the snapshot being created, scroll up (CTRL-B) and you will see a section in the log give complete details on each snapshot created. For example:

Figure 3: Snapshot Log
- Enter :q! to quit out of viewing the snapshot log
Did the snapshot run out of room?
- If the snapshot runs out of room before the backup completes, then data will be incomplete.
- At the command prompt prompt, enter in lvs to display the current snapshot status. L
- ook at the Snap% column to verify none of the snapshots have filled
- If any snapshot is at 100% then the data has changed in the snapshot and is no longer valid which means the backup copy is invalid.
- NOTE, this lvs info is recorded in the snapshot log file too and is displayed at the beginning of the file before a new snapshot
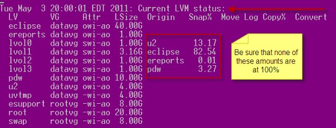
Figure 4: Yesterday’s Snapshot Space
When does the next snapshot occur?
Snapshots are created when the snapsave_linux.sh script is run. The script is set to run at a predetermined time, which is placed in the root crontab. By default, the next snapshot will occur 24 hours from the previous snapshot. Do not continually run the script thinking that more snapshots means more data preserved for backup.
Verifying Rsync Backups
The /tmp/snapsave.log contains the output from the last successful rsync backup.
- Open a command prompt
- View the log: less /tmp/snapsave.log
The log for a successful rsync backup will show output similar to the following:
Copy done - status=0

Number of files: 2248894
Number of files transferred: 6519
Total file size: 181.30G bytes
Total transferred file size: 135.72G bytes
Literal data: 135.72G bytes
Matched data: 0 bytes
File list size: 82.91M
File list generation time: 0.001 seconds
File list transfer time: 0.000 seconds
Total bytes sent: 135.82G
Total bytes received: 152.13K

sent 135.82G bytes  received 152.13K bytes  14.44M bytes/sec
total size is 181.30G  speedup is 1.33
The /tmp/snapsave.rsync-local.log contains the files that were backed up or updated by local rsync backup operation (e.g. RD1000, NAS).
The following log file shows a successful backup and details the database and snapshot operations taking place. This is very useful for troubleshooting backup issues.
--------------------------------------------------------------------------------
Tue Sep  7 21:00:05 CDT 2010: Current snapshot status
Snapshots for /u2
Current  Location          512-blocks        Free Time
*        /dev/fslv00           163840       50432 Mon Sep  6 21:01:32 CDT 2010
Snapshots for /u2/eclipse
Current  Location          512-blocks        Free Time
*        /dev/fslv01          2818048     1512448 Mon Sep  6 21:01:39 CDT 2010
Snapshots for /u2/eclipse/ereports
Current  Location          512-blocks        Free Time
*        /dev/fslv02            32768       32000 Mon Sep  6 21:01:44 CDT 2010
Snapshots for /u2/pdw
Current  Location          512-blocks        Free Time
*        /dev/fslv03          1835008     1833984 Mon Sep  6 21:01:48 CDT 2010
--------------------------------------------------------------------------------
Tue Sep  7 21:00:16 CDT 2010: Releasing and unmounting previous snapshots
Tue Sep  7 21:00:18 CDT 2010: Unmounting /snap/u2/pdw
Tue Sep  7 21:00:23 CDT 2010: Removing snapshot(s) of /u2/pdw
rmlv: Logical volume fslv03 is removed.
Tue Sep  7 21:00:31 CDT 2010: Unmounting /snap/u2/eclipse/ereports
Tue Sep  7 21:00:32 CDT 2010: Removing snapshot(s) of /u2/eclipse/ereports
rmlv: Logical volume fslv02 is removed.
Tue Sep  7 21:00:39 CDT 2010: Unmounting /snap/u2/eclipse
Tue Sep  7 21:00:40 CDT 2010: Removing snapshot(s) of /u2/eclipse
rmlv: Logical volume fslv01 is removed.
Tue Sep  7 21:00:47 CDT 2010: Unmounting /snap/u2
Tue Sep  7 21:00:47 CDT 2010: Removing snapshot(s) of /u2
rmlv: Logical volume fslv00 is removed.
--------------------------------------------------------------------------------
Tue Sep  7 21:00:53 CDT 2010: Suspending database
--------------------------------------------------------------------------------
Tue Sep  7 21:00:59 CDT 2010: Performing snapshots:
Tue Sep  7 21:00:59 CDT 2010: Taking snapshot of /u2
Snapshot for file system /u2 created on /dev/fslv00
Tue Sep  7 21:01:04 CDT 2010: Taking snapshot of /u2/eclipse
Snapshot for file system /u2/eclipse created on /dev/fslv01
Tue Sep  7 21:01:11 CDT 2010: Taking snapshot of /u2/eclipse/ereports
Snapshot for file system /u2/eclipse/ereports created on /dev/fslv02
Tue Sep  7 21:01:16 CDT 2010: Taking snapshot of /u2/pdw
Snapshot for file system /u2/pdw created on /dev/fslv03
--------------------------------------------------------------------------------
Tue Sep  7 21:01:21 CDT 2010: Database suspend released.
--------------------------------------------------------------------------------
Tue Sep  7 21:01:21 CDT 2010: Mounting snapshot filesystems
Tue Sep  7 21:01:23 CDT 2010: Mounting snapshot: /snap/u2
Tue Sep  7 21:01:25 CDT 2010: Mounting snapshot: /snap/u2/eclipse
Tue Sep  7 21:01:27 CDT 2010: Mounting snapshot: /snap/u2/eclipse/ereports
Tue Sep  7 21:01:30 CDT 2010: Mounting snapshot: /snap/u2/pdw
rmt0 changed
Tue Sep  7 21:02:05 CDT 2010: Starting backup from /snap
--------------------------------------------------------------------------------
Tue Sep  7 22:40:15 CDT 2010: Mailing backup report
--------------------------------------------------------------------------------
Verifying CrashPlan Backups
(For ABS Online Backup customers only.)
CrashPlan Pro is the software used to backup the snapshot and other files on the server. The software provides enough granularity to enable backups of files during a defined scheduled period. Typically, CrashPlan is scheduled to run between 12 and 5 hours dependent upon the system’s availability as indicated by the customer.
CrashPlan uses a checksum method to determine if a file has been changed. The checksum is run between files obtained in the last backup and current files on the system. CrashPlan can be pre-set to use a specific percentage of resources during the backup phase; however, the less resources committed to the backup means a longer timeframe for the backup.
When the file size is too large for the scheduled time the backups will occur, files will not be backed up (not good).
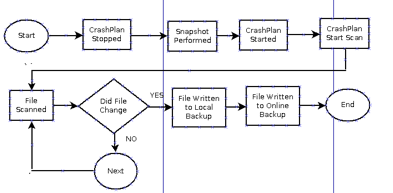
Figure 5: Basic CrashPlan Pro Backup
Figure 5 shows the basics behind CrashPlan performing a backup. Remember, the Snapshot will stop and restart CrashPlan so we can backup the current Snapshot. CrashPlan only backs up new versions of the file and will ignore file duplicates.
In order to determine if CrashPlan has performed the backup, there is a log file provided under /usr/local/crashplan/log/history.log.0. Figure 6 shows what a good backup looks like. To view the file enter the command vim –R /usr/local/crashplan/log/history.log.0
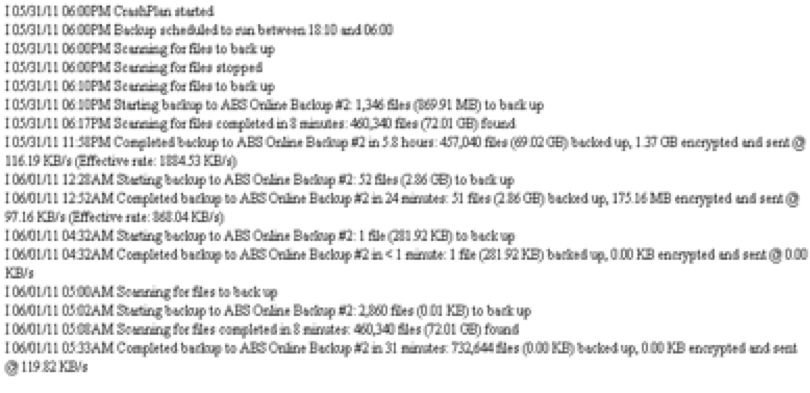
Figure 6: Good CrashPlan Pro Backup
The timeframe or window for the CrashPlan backup is 18:10 (6:10 PM) to 06:00 (6 AM). The first line shows that CrashPlan service has started at 6:00PM which would have resulted from the snapshot process starting up CrashPlan after it takes a snapshot of the database. You are interested in the backup performed within the backup schedule.
Figure 7 shows that CrashPlan found 72GB to backup and at 12:52 AM CrashPlan completed transmission of the backup in two scans to the Online Backup Server.

Figure 7
Figure 8 shows CrashPlan performs one more scan of the file system at 5 AM. This is known as the “verify backup file selection time”. Notice CrashPlan found 72.01 GB at 05:08 AM. The files were not transmitted because they contained the same data as the 12:52 AM scan that was transmitted. You always want to see results similar to Figure 6 with your backups.

Figure 8: CrashPlan Final Scan
Figure 9 shows a typical error when CrashPlan performs a scan and wants to transmit a backup to the online or local media when it is not accessible. If the media is local, check to ensure the device is on-line with a ‘df –h` command (in TCL). If the device is not showing, mount the device to the server.

Figure 9: CrashPlan Pro unable to connect to device
Summary
Verifying your snapshot and backup logs are important. Keep these points in mind while reviewing your data backups:
- Make sure you have both an on- and off-site backup. Multiple backups are important.
- Make sure the backup window allows enough time for all of the backups to complete.
- Make sure your backup devices have enough room to complete the backups, and watch the logs for warnings about space.
- Make sure the snapshots are mounted and the size matches the active filesystems.
- Make sure there are no warnings or errors in the snapshot log.
- Make sure there are no warnings or errors in the rsync log.
- (ABS Online Backup) Make sure there are no warnings or errors in the CrashPlan log.
- Make sure the check the backup log after each backup (i.e. if the backup runs every night, check the logs every morning)
If you are having problems determining if there is a problem with the backups, seek knowledgeable help. Also, Epicor provides an optional backup-monitoring service, which consists of backup engineers reviewing the system status and backup logs in detail, every business day and notifying you of issues if they occur. If you’re interested in this service, please contact your Epicor account manager for more information.
Backup Checklist
Date:
Backup Window:
Start Time:
Finish Time:
Did snapshot run?
Time Completed:
Any errors in the /tmp/snapsave.log?
Did all of the /snap directories remount?
Did the Snapshot run out of room?
When will the next Snapshot occur?
Did CrashPlan Pro run during the scheduled times?
Were the number of files and size of the scan backed up?
Did the final verification of the backup window complete?
Did the backup complete at the scheduled finish time?
Did the backup complete before the next snapshot occurred?
(ABS Online Backup) Did you notice any errors in the /usr/local/crashplan/log/history.log.0 file?
