How do I Download & Install the vSphere Client?

How do I Download & Install the vSphere Client
The vSphere Client is a Windows program that you can use to configure the host and to operate its virtual machines. You can download vSphere Client from any host.
Prerequisites

  • You must have the URL of the host, which is the IP address or host name.
  • The system must have a network connection.

Procedure

  • From a Windows machine, open a Web browser.
  • Enter the URL or IP address for the host. http://192.168.0.223
  • Click Download the vSphere Client under Getting Started.
  • Click Save to download the vSphere Client installer.
  • Install the vSphere Client.

How to log into an ESXi host:

    • From a Windows machine, open the VMware vShpere Client.
    • Enter IP address of the ESXi host: 192.168.0.223, username and password

Eclipse Mobile 3 Force HTTPS

To force Eclipse Mobile 3 users to the secure (HTTPS) version of the website, whether or not they browse to the insecure (HTTP) version of the page:

Ensure that Eclipse Mobile is accessible via both HTTP and HTTPS before continuing.

Download and install Microsoft’s URL Rewrite extension.

Make a backup copy of the Eclipse Mobile web.config file, which is typically located at C:\Eclipse\Mobile\web.config.

Add a rewrite rule to send users to the HTTPS version of the mobile site. There are two methods to accomplish this:

You may manually edit the web.config file, and add a new rule in the section between <rewrite> and </rewrite>:

<rule name="HTTP to HTTPS redirect" stopProcessing="true">
  <match url="(.*)" />
    <conditions>
      <add input="{HTTPS}" pattern="off" ignoreCase="true" />
    </conditions>
  <action type="Redirect" redirectType="Found" url="https://{HTTP_HOST}/Mobile/{R:1}" />
</rule>

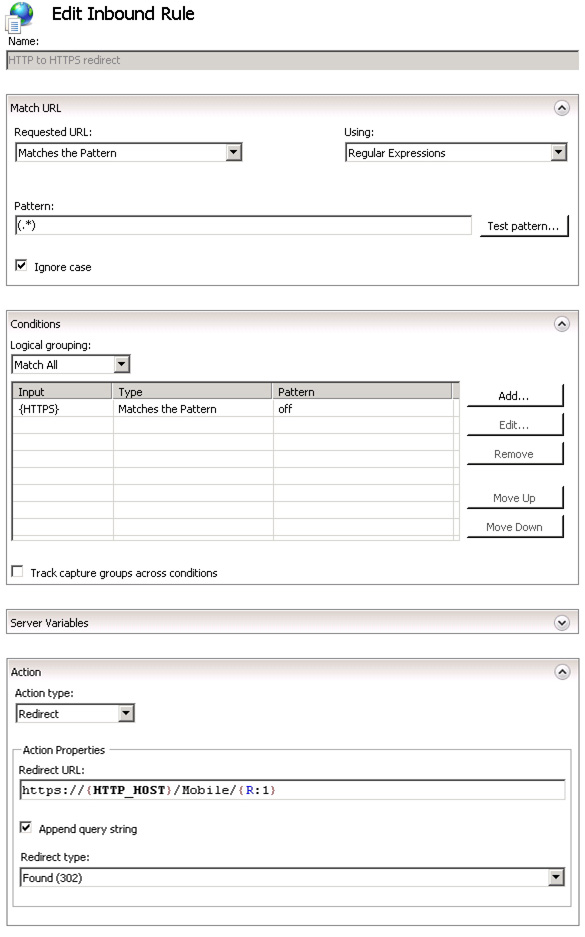
If you are not comfortable modifying the web.config file directly, you may also add the rule via the IIS Manager GUI.

Browse to Sites -> Default Web Site -> Mobile. In the features view, open URL Rewrite. Select “Add Rule”, and enter the following settings:

IIS Rewrite Rule

Using SendGrid for Eclipse Outbound Email

Overview

SendGrid is a cloud-based email delivery service. Why would you use this service, when you have an existing mail server? Well, if you’re having any one of the following issues, using this service may help:

  • Your email sent from certain addresses are being rejected (ex. Office365)
  • Your emails are being sent with a single reply-to address (ex. Google Apps, Gmail)
  • Your mail hosting provider doesn’t allow relay
  • Your emails are delivered very slowly
  • Your emails are being flagged as SPAM

There are other services similar to SendGrid available, but we can recommend SendGrid based on existing Eclipse customer feedback and our own internal testing. They offer a free plan for sending up to 200 emails per day (useful for commitment-free testing), a “pay per email” plan, and various flat-rate monthly plans.

Account Setup

To get started with SendGrid, you must first sign up for an account. For a 25% discount on any paid plans for the first three months, you may use this link, or go to sendgrid.com directly. ((To provide you with the discount, this is a referral link, but Eclipse doesn’t profit from the referral other than receiving credit towards a SendGrid, which we only use for development testing purposes. If you are not comfortable with this type of referral, please feel free to visit sendgrid.com directly and sign up for the service without the discount.))

Fill out the required information. We recommend that you generate a unique, random password, as it will be stored on your Linux server later. After you have finished signing up, SendGrid will review your account and send you an email when it has been provisioned. If you don’t receive the email, and your account dashboard still shows that your account is being provisioned, chat or email their support team to accelerate the process.

When your account has been provisioned, you’re ready to proceed with configuring your Linux server to use SendGrid.

Linux Server Configuration

If you subscribe to LTS, you may contact the Eclipse UNIX team for assistance with configuring SendGrid. Please be ready to provide your SendGrid username and password.

To configure the Linux server’s postfix MTA to relay via SendGrid, open the /etc/postfix/main.cf configuration file using any text editor, and add the following information (change the fields in red to your SendGrid username and password):

smtp_sasl_auth_enable = yes
smtp_sasl_password_maps = static:yourSendGridUsername:yourSendGridPassword
smtp_sasl_security_options = noanonymous
smtp_tls_security_level = may
start_tls = yes
header_size_limit = 4096000
relayhost = [smtp.sendgrid.net]:587

After the file has been saved, restart postfix to apply the changes:

service postfix restart

At this point, you should be able to send emails via SendGrid.

Troubleshooting

If your emails aren’t going through, check the postfix log:

tail /var/log/maillog

Note any authentication or rejection errors, and contact the Eclipse UNIX support team or SendGrid support.

If the postfix log shows successful relay, but the mail isn’t being delivered, check the SendGrid logs or contact SendGrid support.

FAQ

Q. Does SendGrid work with AIX?
A. No, because SendGrid requires SMTP AUTH and SASL, which AIX’s sendmail doesn’t support.

Q. Can I use SendGrid with Eclipse Forms or Job Management?
A. Yes, just use the Linux server’s IP address as the SMTP server, and postfix will relay all mail through SendGrid.
VMware Upgrade

There are many ways to upgrade VMware, but we recommend the following procedure for its simplicity:

  • Download and burn the ESXi installation CD/DVD (download instructions for Dell servers)
  • Insert the ESXi installer CD/DVD into the CD/DVD-ROM drive
  • Boot from the CD/DVD-ROM drive
  • At the the Select a Disk screen, select the drive on which you wish to install/upgrade VMware
  • If this is an upgrade, and the installer detects an existing installation of VMware, it will prompt you to choose from a few options:
    • Upgrade ESXi, preserve VMFS datastore: normal upgrade, keep configuration settings and VMs (this is the most common option for upgrades)
    • Install ESXi, preserve VMFS datastore: clean install, discard configuration settings, but keep VMs (this is the option you would choose if the VMware configuration is problematic, and you wish to start over)
    • Install ESXi, overwrite VMFS datastore: clean install, discard configuration settings and VMs (this is the option you would choose if you wanted to wipe the entire server and start over)
  • Press F11 to confirm your choices and start the upgrade
  • When the upgrade is complete, remove the installation CD/DVD
  • Press Enter to reboot the server

After the server has rebooted, log in via vSphere Client to verify everything is operating normally.

NOTE: In certain cases (e.g. major version changes), you will need to re-license VMware (this applies even if you are using the free vSphere license). If you fail to activate a license, your VMs will not power on after the 60 day evaluation period ends.

Resources