How do I view my Eclipse tape backup logs on Linux?

The standard tape backup script keeps a number of log files that are accessible to the system administrator. To view the log files, log into your server as root and run the following commands. You may also configure the backup script to send an email every time the backup is run.

/tmp/backup.err contains the output from the tape backup command

cat /tmp/backup.err

The log for a successful tape backup will show output similar to the following, which indicates that 12 GB of data was backed up.

Total bytes written: 12501135360 (12GiB, 5.4MiB/s)

/tmp/backup.chk contains the start and stop timestamps for the tape backup operation

cat /tmp/backup.chk

The following log file indicates the backup ran for 30 minutes.

Backup started at: Mon Feb 22 21:00:05 EST 2010
Backup ended at: Mon Feb 22 21:30:11 EST 2010

/tmp/snapsave.log logs database suspension and snapshot operations:

cat /tmp/snapsave.log

This log file shows whether successful snapshot and/or backup processes took place, and details the database and snapshot operations taking place. This is very useful for troubleshooting backup issues.

The following excerpt from snapsave.log is an example of a successful tape backup:

Mon Dec 12 20:00:02 EST 2011: Starting tape backup to /dev/st0
Mon Dec 12 21:33:11 EST 2011: Checking Snapshot:
  LV       VG     Attr   LSize   Origin   Snap%  Move Log Copy%  Convert
  lvol0    datavg swi-ao 512.00M u2         6.73                        
  lvol1    datavg swi-ao   4.25G pdw        0.33                        
  lvol2    datavg swi-ao   5.76G eclipse    9.42                        
  lvol3    datavg swi-ao 512.00M ereports   0.21                        
Mon Dec 12 21:33:11 EST 2011: Ending tape backup to /dev/st0
Reinstall Solar

Basic Reinstall Procedure

If you’re having problems with Solar, it may be worthwhile to clear your cached Solar files and reinstall from the web-start link.

  • Navigate to the Control Panel
  • Select Java
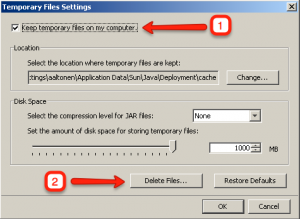
  • From the Java Control Panel, click the “Settings…” button under the Temporary Internet Files section
  • Verify that Keep temporary files on my computer is checked
  • Choose Delete files
  • Reinstall Solar using the Click Here to Install Solar link (see also: How do I install the Solar client?)

View a step-by-step screencast of this process:

Advanced Reinstall Procedure

The following procedure should be used if the above basic procedure doesn’t work:

NOTE: If you are using Windows 7, REDUCE UAC (USER ACCESS CONTROL) to the minimum setting before attempting to install solar.  You may set UAC back to your desired level after solar has been installed. Ref: http://windows.microsoft.com/en-US/windows7/products/features/user-account-control

  • From the Start menu, select Run
    • For Windows XP, paste/type and run: %APPDATA%
    • For Windows 7, paste/type and run: %USERPROFILE%\AppData\LocalLow
  • In the Explorer window that opens, delete the Sun folder
  • Reinstall Solar using the Click Here to Install Solar link

If Solar does not function after performing the above steps:

  • Navigate to the Control Panel
  • Uninstall all Java Runtime Environments
  • Reboot the computer
  • Install only the Java Runtime Environment available on the Solar web start page

If Solar still does not function after performing the above steps:

  • Log in as Local Admin on the Desktop
  • Remove the Windows User Profile where the SOLAR issues are occurring.
  • Reboot, Log back in as that user, then Reinstall SOLAR

How do I enable core dumps on Red Hat Enterprise Linux?

A core dump is a on disk representation of a state of a user space application at the time of its abnormal termination. Core dumps can be used to diagnose the cause of a crash of an application.

Core dumps are not useful to end users, as they require specialised skills to analyze and determine the cause of the crash. In most cases, enabling a core dump is not necessary until there is a specific need.

In Red Hat Enterprise Linux, core file creation is disabled for interactive shells. This is configured in the /etc/profile by theulimit command.

The /etc/profile contains system wide environment variables and commands that will be run for any interactive shell. By default, it contains this line:

ulimit -S -c 0 > /dev/null 2>1

To enable core dumps for interactive or non-daemon programs, change this line to:

ulimit -S -c unlimited  >/dev/null 2>1

This will allow all users to produce core files with no upper size limit.

Resources:

Why are there so many J2EE phantoms running?

The connection pool of J2EE phantoms is automatically sized based on the number of UV licenses you have available on your server. The default setting is sized based on the number of connections that works best for a Solar customer.

If you are not a full Solar customer, or if do not wish to open as many connections, you may manually set the minimum and maximum number of connection pool J2EE phantoms.

The connection pool parameters are stored in $ACCOUNT_HOME/modules-conf/solar-jca.properties:

# The following settings control the size of the connection pool (min & max).
#
# If you don't specify a min or a max, the connection pool is automatically
# sized based on the number of UV licenses for the server.  This is good because
# we don't have to remember to change this file as the customer grows.  However,
# you probably want to restrict the connection pool size by setting the min and
# max for training/play accounts.
#
# The default for the min is 15% of the UV licenses.  The default for the max
# is the number of UV licenses - 5 (-5 if they have WOE) (-5 if they have
# BC:XML).  For example, 100 UV licenses and no companions: max of 95.  100 UV
# licenses and BC:XML: max of 90.

If you wish to change these parameters, the syntax is as follows:

pool.maxTotal=25
pool.minTotal=10

You must restart JBoss for the new settings to take effect.

Why doesn’t Eterm look right when logged in as root on a Linux server?

Eterm uses a proprietary terminal emulation and does not transmit this information to the Linux server upon login. If you don’t manually set the terminal type, you will experience issues (vi won’t work, backspace will result in strange characters, etc.).

After logging in, type:

export TERM=vp60
Backspace will not work, but you can use CTRL-BACKSPACE or the LEFT ARROW keys at the login screen.