How to find the serial number of your Synology NAS

You will need the serial number of the NAS to contact technical support.   It should be located on the unit but if you’d like to validate that or find it remotely.

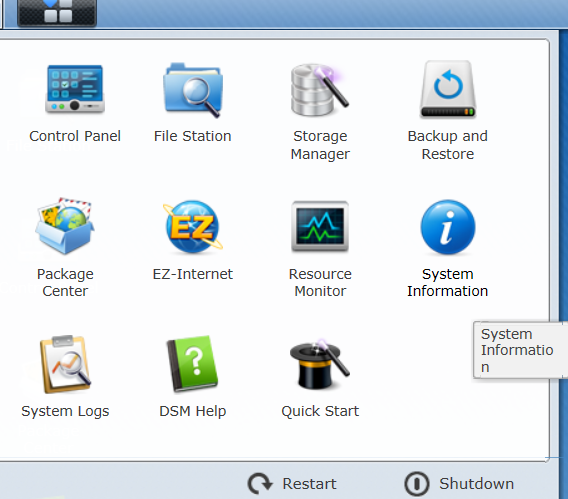
1. Login to the NAS http://NASipaddress:5000 (the default username is admin with no password).

2. Click on the icon in the top right corner

nasicon

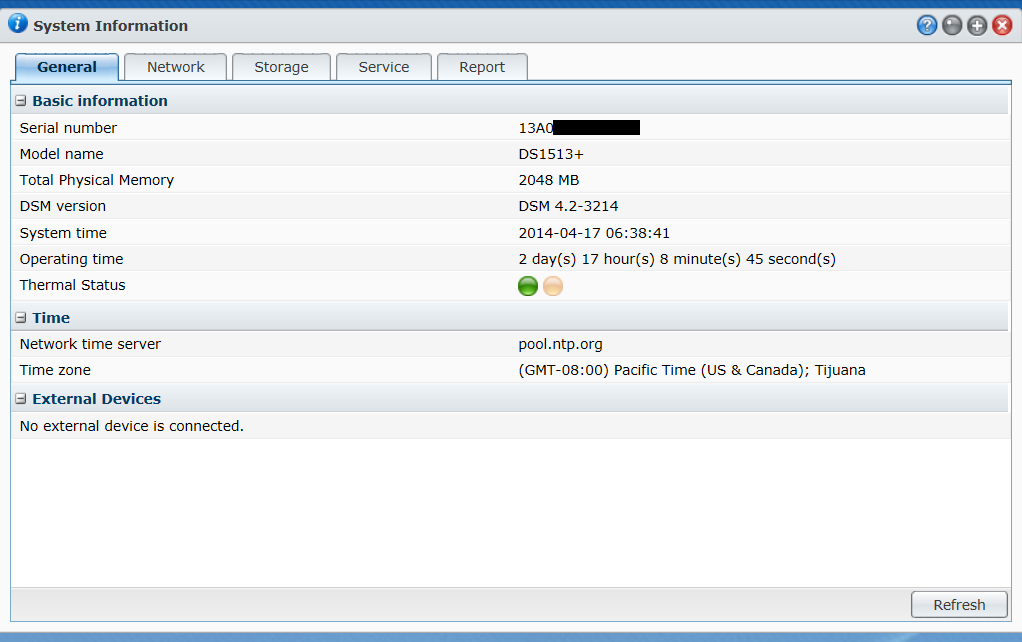
3.  Click on System Information nasscreenshot

4. You should see the serial number listed under the “General” Tab

serialNAS

Heartbleed and Eclipse FAQ

Q: Is Eclipse affected by Heartbleed?
A. The short answer is no.

Q: What Eclipse products use SSL?
A. Eclipse uses SSL in its application server, JBoss, and its external web server, IIS.

Q: Is the JBoss application server used by Eclipse affected by Heartbleed?
A: No. JBoss is a Java application, and it uses Java’s own SSL implementation. For more details, see this statement by the lead security architect for JBoss: http://anil-identity.blogspot.com/2014/04/jbosswildflyas-openssl-heartbleed.html

Q: Is the IIS web server used by Eclipse affected by Heartbleed?
A: No. IIS uses Microsoft’s own SSL implementation. For more details, see Microsoft’s official statement: http://blogs.technet.com/b/erezs_iis_blog/archive/2014/04/09/information-about-heartbleed-and-iis.aspx

Q: Have you tested the Eclipse software to make sure that it’s not vulnerable?
A: Yes, we have tested both JBoss (Solar, Job Management) and IIS (Web Order Entry) using the open-source heartbleeder tool, and all of the Eclipse software passed the tests.

Q: How can I test my own servers for the vulnerability?
A: The easiest way to test an external, Internet-accessible web server is through a website like this one. If you need to test an internal server, you can download the heartbleeder tool, which is a simple, command-line utility that runs on multiple platforms.

Q: I know it doesn’t run on my Eclipse server, but is the Element credit card payment processing service vulnerable?
A: As far as we can tell, no, but we have yet to receive an official statement from Element. We have tested all of the web services used by Eclipse for Element payment processing (https://certtransaction.elementexpress.com, https://certreporting.elementexpress.com, https://certservices.elementexpress.com), and none of them are vulnerable.

Q: I run Red Hat Enterprise Linux, and OpenSSL is installed by default. Is my server affected?
A: Maybe. If you are running Red Hat Enterprise Linux 6.5 or above, you may be running an affected version of the openssl software. RHEL versions 6.4 an below, and all version of RHEL 5 are not affected. If you are running RHEL 6.5 or above, we recommend that you run “yum update openssl” and rebooting your server as soon as possible to install the patched version of openssl. For more information, see this article from Red Hat: https://access.redhat.com/site/solutions/781793

Q: What is Heartbleed?
A: There are many resources available on the Internet, but we suggest starting with the “official” homepage (http://heartbleed.com/) or watching this video.

Q: How do you recommend that I keep my servers secure in the future?
A: Please review our list of best practices, which includes the recommendation to update your server’s software and firmware on a regular basis.

Q: You didn’t answer all of my questions!
A: Please feel free to leave a public comment below, or open a support request with our systems team.
Reset APC UPS

Hard Reset of the Smart-Ups microprocessor

(Referred to by APC support as the Brain Dead Procedure)

Problem: An APC SMT or SMX unit will not have all the menu options. It could also have a bank of power sockets on the rear are not operational. Other oddities may also be occurring.

Resetting to Factory Defaults does not resolve the issue(s).

Solution: Perform a Hard Reset by following the steps below.

  1. Turn off UPS via control panel on front of unit.
  2. Unplug UPS from the wall.
  3. Disconnect the battery. This is a plug on the rear of the unit labeled “ BATTERY CONNECTOR” (You  may hear an audible click from the UPS)
  4. Reconnect the battery
  5. Turn on UPS
  6. Plug UPS into the wall
  7. Test for original failing condition.

Transfer Dell Ownership

Congratulations on your new Dell Server! We at Epicor would like to thank you for your business and want to make sure you have no issues getting your Dell product serviced should the need ever arise. This guide provides step by step instructions to transfer ownership of your new Dell system from Epicor to you, the new owner. Service tag ownership of personal computers may also apply if you have purchased our Dell-branded point of sale, or workstation.

Go to http://www.dell.com/ownershiptransfer

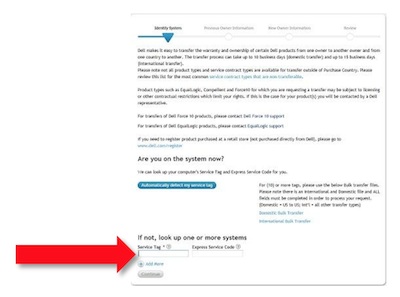
At the bottom, enter the service tag number for the system, and click Continue.

Transfer 1

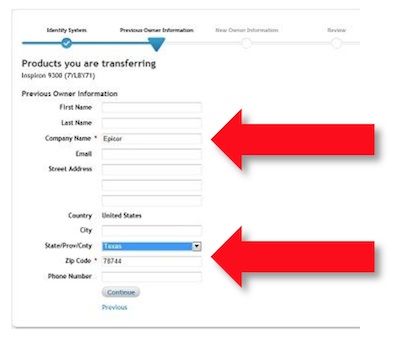
On Previous Owner information screen, enter Epicor as Company Name and zip code 78744. You can also find this information on the server box shipping label. No other information is required. At the bottom, click continue to be taken to the new owner page.

Transfer 2

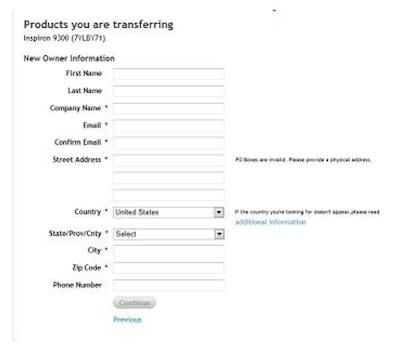
Only red asterisk information is required, the more details you can provide here the easier it is for Dell to complete the transfer. Once the continue button is clicked, this will initiate the change of ownership process after a final review is performed.

Transfer 3

Dell currently has a 10-15 day period for transferring the information. However, if you need assistance before this is completed, you will only need to provide the service technician with the Previous Owner Company name and zip code and let them know a transfer of ownership has already been entered.

Troubleshooting Common Cisco VPN client Issue (Windows 8)


Reason 442: Failed to enable Virtual Adapter:
There are usually two common reasons for this to fail. Please try method 1 first and if that is still unsuccessful, move onto method 2.

vpn client

Method 1:

1. Close down VPN and then hover your mouse over the right hand bottom corner of the screen so the ‘side-menu’ appears. Click the ‘Search’ option.

services

2. In the Search box enter: services.msc and click the ‘Services’ box that it finds in the results section on the left hand side.

3. In the Services menu, find the entry called Cisco System, Inc. VPN Service and right-click on it and select ‘Stop’.

4. In the Services menu, now find the entry called Internet Connection Sharing (ICS) Service and right-click on it and also select ‘Stop’ and ‘disable’ (if not already disabled).

5. Now, go back to the Cisco Sytem, Inc. VPN Service  entry again and right-click ‘Start’.

If that still does not fix the issue, please proceed to Method 2.

Method 2:

1. Close down VPN and then hover your mouse over the right hand bottom corner of the screen so the ‘side-menu’ appears. Click the ‘Search’ option.

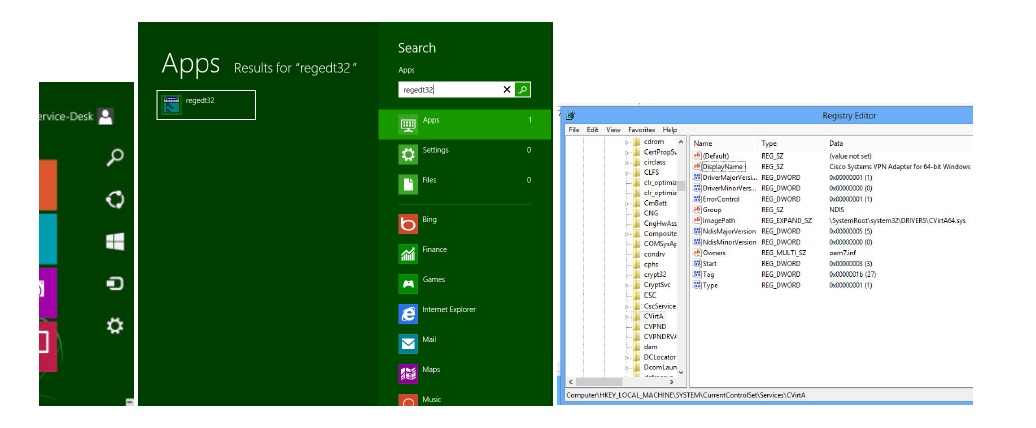
2. In the Search box enter: regedt32 and click the ‘regedt32’ box that it finds in the results section on the left hand side.

registry

3. Browse to the Registry:
HKEY_LOCAL_MACHINE\SYSTEM\CurrentControlSet\Services\CVirtA

4. Select the DisplayName to modify, and remove the leading characters from the value data up to %;” i.e. For x86, change the value data from the path similar to:@oem8.inf,%CVirtA_Desc%;Cisco Systems VPN Adapter” to just “Cisco Systems VPN Adapter” For x64, change the value data from the path similar to:”@oem8.inf,%CVirtA_Desc%;Cisco Systems VPN Adapter for 64-bit Windows” to just “CiscoSystems VPN Adapter for 64-bit Windows”.

5. Close the Registry Editor and try connecting again to Cisco VPN

Standard disclaimer: The Windows Registry File is vitally important to the proper operation of the Windows operating system. Please back up the file before you make any registry edits.  This is not something Epicor Support can help you with if you choose to edit the registry.  For method 2, please revert back to the origional registry key entry if this solution does not work.