- You will need your IBM customer number and system number.
- If you don’t have this, you may call IBM Software: 800-879-2755 option 2 option 2
- Ask IBM for your customer number and system number; they will ask for your system model and serial number, which are printed on a sticker that’s on your server.
- Log into IBM Entitled Software Support
- Select Register Entitled Customer Number
- Select Downloads
- Select Server
- Select AIX SPO
- Select AIX Base v7.1.0,ENU,DVD (whichever is the most current version)
- Follow prompts for electronic software delivery (downloads) or request physical media delivery (if available)
Author: paul.deluca
How do I place a Red Hat software support request?
Use the following procedure to determine who your software support vendor is:
- Log into Red Hat Network and access the Subscriptions page: https://access.redhat.com/wapps/support/protected/subscriptions.html
- If the “Support” column lists “RHN/Web” and “RHN/Web/Phone” your point of contact for software support is Red Hat:
https://access.redhat.com/support/cases/platform - If the “Support” column lists “Vendor,” your point of contact for software support is the hardware vendor. See:
http://kb.eclipseinc.com/kb/how-do-i-contact-dell-for-technical-support/
How do I monitor my APC UPS on Linux?
If you have an APC UPS connected to your server via serial or USB cable, we recommend using the PowerChute Business Edition software provided and supported by APC.
Installation
Before getting started, download and review the PowerChute documentation and installation documentation, which are both available from the APC downloads page.
After downloading the latest version of the PowerChute software from APC’s website, you will have to transfer the installation file to the Linux server (ex. ftp, scp, samba), extract it, and run the installer. Here’s an example:
cd /esupport/powerchute
tar xzf pcbe852_linux.tar.gz
rpm -Uvh pbeagent-8.5.2-607.i386.rpm
cd /opt/APC/PowerChuteBusinessEdition/Agent
./config.sh
Answer the questions as prompted. Here is an example configuration:
- Username: apc
- Password: apc
- Repeat password: apc
- Select cable type: 1 for smart signaling
- Select USB or serial port (e.g. 1 for /dev/ttyS0 onboard port)
- Are the settings correct? Yes
- Start PowerChute now? Yes
Configuration
Once PowerChute has been installed, you may access it via its web interface at: https://SERVER_IP_ADDRESS:6547/config/
Log in with the username and password you defined previously.
Use the web interface to check the status of your APC UPS or to configure shutdown parameters.
Support
To contact APC for hardware support or software configuration questions:
Note: if you encounter a warning about missing packages, please see this APC FAQ.
How do I authorize UniVerse on AIX?
To authorize UniVerse on AIX:
- Log out all Eclipse users from Eterm.
- Login to Eterm as root.
- Stop Eclipse SYSTEM.ADMIN, JBoss and the UV database:
/u2/eclipse/modules/bin/services.sh -k -d all
/etc/uv.rc stop
- Update the UV authorization (replace [Install SN#] and [Auth Qty] with the numbers from the Rocket|U2 license change confirmation email)
cd /u2/uv
bin/uvregen -s [Install SN#] -u [Auth Qty]
bin/uvregen -C
- If the above commands do not produce a 35-digit code, you can force the code to appear by changing the user count by 1 and then back. Example, it you have 100 users, try:
bin/uvregen -u 99
bin/uvregen -u 100 (note this configuration code) - Note the resulting configuration code for the next step.
- Open the U2TC authorization website: https://u2tc.rocketsoftware.com/authprod.asp
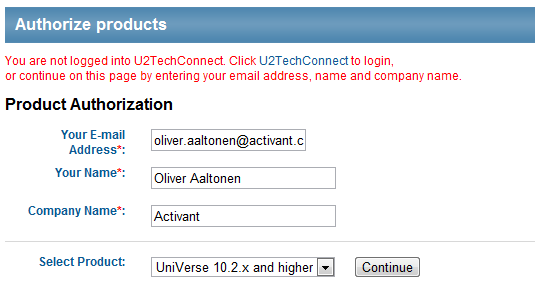
- Fill out the first page with your contact information and select UniVerse 10.2.x and higher and press Continue:

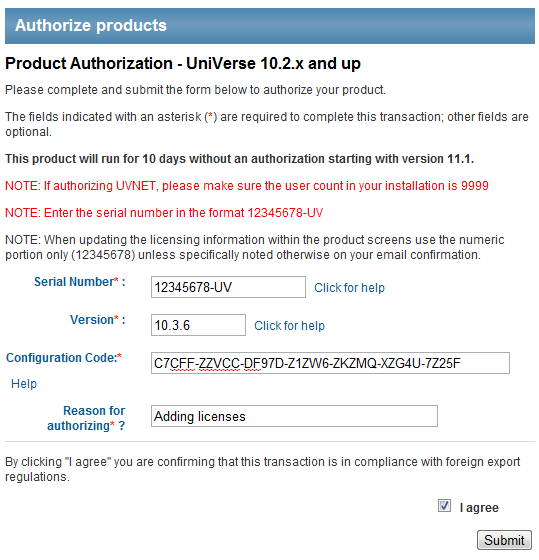
- Fill out the next page using the information from the Rocket|U2 license change confirmation email and the configuration code from the previous steps, then press Submit. Here’s an example:

- Note the authorization code given on the confirmation page.
- On the Eclipse server, authorize UV (replace [authorization code]) :
bin/uvregen -A [authorization code]
- You may confirm your license count by running the following command:
bin/uvregen -z
- Start the UV database, Eclipse SYSTEM.ADMIN, and JBoss:
/etc/uv.rc start
/u2/eclipse/modules/bin/services.sh -e all
Reference:
How to Authorize UniVerse 10.2.0 and higher
Screencast:
Before you begin, it may be helpful to watch this short video, which goes over the entire process from start to finish:
How do I authorize UniVerse on Linux?
To authorize UniVerse on Linux:
- Log out all Eclipse users.
- Login to the server as root.
- Stop Eclipse SYSTEM.ADMIN, JBoss and the UV database processes:
service eclipse-jboss stop
service monit stop
service eclipse-system-admin stop
pkill -4 -f phantom
pkill -4 -f uv
service uv.rc stop
- Update the UV authorization (replace [Install SN#], [Auth Qty] and [Expiration Date] with the numbers from the Rocket|U2 license change confirmation email)
cd /u2/uv
bin/uvregen -s [Install SN#] -u [Auth Qty] -e [Expiration Date]
bin/uvregen -C
- Note the resulting configuration code for the next step.
- Open the U2TC authorization website: https://u2tc.rocketsoftware.com/authprod.asp
- Fill out the first page with your contact information and select UniVerse 10.2.x and higher and press Continue:

- Fill out the next page using the information from the Rocket|U2 license change confirmation email and the configuration code from the previous steps, then press Submit. Here’s an example:

- Note the authorization code given on the confirmation page.
- On the Eclipse server, authorize UV (replace [authorization code]) :
bin/uvregen -A [authorization code]
- You may confirm your license count by running the following command:
bin/uvregen -z
- Start the UV database, Eclipse SYSTEM.ADMIN, and JBoss:
service uv.rc start
service eclipse-system-admin start
service monit start
service eclipse-jboss start
Reference:
How to Authorize UniVerse 10.2.0 and higher
Screencast:
Before you begin, it may be helpful to watch this short video, which goes over the entire process from start to finish: