How do I upgrade the Fusion-io drivers?

This article was last updated April 2011.

Any time the kernel is upgraded, you’ll need to recompile and reinstall the drivers. As such, it is important to plan your kernel upgrades in advance and perform testing after the first boot using a new kernel.

If you are an IBM customer using IBM High IOPS adapters, please refer instead to the latest IBM documentation, drivers and firmware located at IBM Fix Central.

The 2.3.x driver builds and runs on a much wider range of kernels than the 1.2.x driver series. It accomplishes this using a new portability layer to abstract itself away from the operating system internals. By following the procedure below, you will obtain a working driver, built for the specific kernel running on your system.

Follow the instructions based on the version of your driver.

Building the Fusion-io Drivers From Source

To view a step-by-step screencast of this process, click here.

Before beginning, download the ioDrive driver source rpm for RHEL from the Dell Fusion-io support site to a temporary directory. At minimum, you’ll need the latest version of the following packages:

  • fio-common
  • fio-firmware
  • fio-sysvinit
  • fio-util
  • iomemory-vsl
  • libfio

Here’s a screenshot showing the packages that need to be downloaded.

Remove prior versions of the ioDrive driver rpm

yum remove iomemory* iomanager* iodrive* fio-* libfio*
rm -rf /usr/src/redhat/RPMS/x86_64/iomemory-vsl-*

For Red Hat Enterprise 5, install the gcc 4.x and kernel-devel packages for your current kernel. The kernel-headers package is also needed, but is typically installed as part of the base operating system.

yum -y install kernel-headers-`uname -r` kernel-devel-`uname -r` rpm-build gcc lm_sensors net-snmp

Change to the directory where you downloaded the ioDrive driver source RPM and begin the rebuild process.

rpmbuild --rebuild iomemory-vsl*.src.rpm

Install the newly-built drivers.

yum install --nogpgcheck fio-sysvinit* fio-common* fio-util* libfio* fio-firmware* iomemory-vsl-source* /usr/src/redhat/RPMS/x86_64/iomemory-vsl-*

Check the status of the ioDrive(s):

fio-status

Found 1 ioDrive in this system

fct0 Attached as 'fioa' (block device)
 Fusion-io ioDIMM3 160GB, Product Number:FS1-001-161-ES SN:6168
 Firmware v5.0.1, rev 42895
 161 GBytes block device size, 198 GBytes physical device size capacity.
 PCI:0c:00.0, Slot Number:6
 Internal temperature: avg 42.3 degC, max 44.3 degC
 Media status: Healthy; Reserves: 100.00%, warn at 10.00%

Upgrading the Fusion-io Firmware

In the previous section, you should have already downloaded and installed the latest firmware package. If not, you may download the fio-firmware package from the Fusion-io Support website to proceed. Once the firmware package is installed, it needs to be applied to the cards.

To upgrade the firmware:

fio-update-iodrive /usr/share/fio/firmware/iodrive_*.fff

Watch the output of the upgrade process and reboot when complete.

Update the Fusion-io Init Scripts

NOTE: this is the new recommended configuration for any customer using multiple Fusion-io ioDrives in a RAID array, as it ensures the cards are all initialized before bringing the RAID array and filesystems online. Reference: http://kb.fusionio.com/KB/a64/loading-the-driver-via-udev-or-init-script-for-md-and-lvm.aspx

Uncomment the blacklist line:

vim /etc/modprobe.d/iomemory-vsl.conf
# To keep ioDrive from auto loading at boot when using udev, uncomment below
blacklist iomemory-vsl

Backup /etc/fstab, and modify it to add “noauto 0 0” to the datavg filesystems:

cp /etc/fstab /etc/fstab.`date +%Y%m%d.%H%M%S`
vim /etc/fstab

Example:

/dev/datavg/u2          /u2                     ext3    defaults,noauto        0 0
/dev/datavg/eclipse     /u2/eclipse             ext3    defaults,noauto        0 0
/dev/datavg/edi         /u2/edi                 ext3    defaults,noauto        0 0
/dev/datavg/ereports    /u2/eclipse/ereports    ext3    defaults,noauto        0 0
/dev/datavg/pdw         /u2/pdw                 ext3    defaults,noauto        0 0
/dev/datavg/uvtmp       /u2/uvtmp               ext3    defaults,noauto        0 0
/dev/datavg/kourier     /u2/kourier             ext3    defaults,noauto        0 0
/dev/datavg/crashplan   /usr/local/crashplan    ext3    defaults,noauto        0 0

Uncomment “ENABLED=1” in /etc/sysconfig/iomemory-vsl to enable init script:

vim /etc/sysconfig/iomemory-vsl
# If ENABLED is not set (non-zero) then iomemory-vsl init script will not be
# used.
ENABLED=1

In the same /etc/sysconfig/iomemory-vsl file, add the RAID array(s) and mount points. For example:

MD_ARRAYS="/dev/md0"
LVM_VGS="/dev/datavg"
MOUNTS="/u2 /u2/edi /u2/eclipse /u2/eclipse/ereports /u2/pdw /u2/uvtmp /u2/kourier /usr/spool/crashplan"

Enable the init script:

chkconfig iomemory-vsl on
chkconfig --list iomemory-vsl

Resources

How does an Eclipse user change their OS password using Eterm?

View a step-by-step screencast of this process:

If you need to change your Eclipse user’s OS password (the one entered at the “white” Eterm login screen):

  • Log into Eterm
  • Select F2-System
  • Select TCL
  • At the TCL prompt (; semicolon), type sh and hit ENTER
  • At the user’s shell prompt ($ dollar sign), type passwd and hit ENTER
  • Follow the prompts to set your new password
  • When finished, type exit to exit the shell.
  • Hit ESC to exit TCL mode
If your new password is not being accepted, you may be violating your company’s password policy by attempting to set a password that is too short or based on a dictionary word. You will need to contact your system administrator to set your password or relax the password restrictions. If you would like your Eterm users to have no OS password, please see How do I set a blank user password in Linux?

Reinstall Solar

Basic Reinstall Procedure

If you’re having problems with Solar, it may be worthwhile to clear your cached Solar files and reinstall from the web-start link.

  • Navigate to the Control Panel
  • Select Java
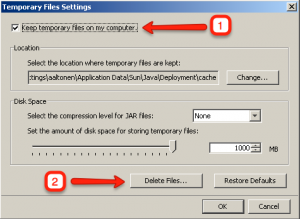
  • From the Java Control Panel, click the “Settings…” button under the Temporary Internet Files section
  • Verify that Keep temporary files on my computer is checked
  • Choose Delete files
  • Reinstall Solar using the Click Here to Install Solar link (see also: How do I install the Solar client?)

View a step-by-step screencast of this process:

Advanced Reinstall Procedure

The following procedure should be used if the above basic procedure doesn’t work:

NOTE: If you are using Windows 7, REDUCE UAC (USER ACCESS CONTROL) to the minimum setting before attempting to install solar.  You may set UAC back to your desired level after solar has been installed. Ref: http://windows.microsoft.com/en-US/windows7/products/features/user-account-control

  • From the Start menu, select Run
    • For Windows XP, paste/type and run: %APPDATA%
    • For Windows 7, paste/type and run: %USERPROFILE%\AppData\LocalLow
  • In the Explorer window that opens, delete the Sun folder
  • Reinstall Solar using the Click Here to Install Solar link

If Solar does not function after performing the above steps:

  • Navigate to the Control Panel
  • Uninstall all Java Runtime Environments
  • Reboot the computer
  • Install only the Java Runtime Environment available on the Solar web start page

If Solar still does not function after performing the above steps:

  • Log in as Local Admin on the Desktop
  • Remove the Windows User Profile where the SOLAR issues are occurring.
  • Reboot, Log back in as that user, then Reinstall SOLAR

How do I install or update the RealPort drivers for my Digi PortServer on Linux?

To use the Digi PortServer, you’ll need to install the appropriate RealPort drivers for your kernel.

Additionally, any time the kernel is upgraded, you’ll need to recompile and reinstall the drivers. As such, it is important to plan your kernel upgrades in advance and perform testing after the first boot using a new kernel.

Screencast

Installing or Upgrading the Digi RealPort Drivers

If the drivers are already installed, uninstall the existing drivers:

rpm -e dgrp

Download the latest drivers, for example:

mkdir -p /esupport/digi && cd /esupport/digi
wget -c http://ftp1.digi.com/support/driver/40002086_AA.src.rpm

Download and install the Red Hat kernel source:

yum -y install kernel-headers-`uname -r` kernel-devel-`uname -r` rpm-build gcc ncurses-devel

Compile the drivers:

rpmbuild --rebuild /esupport/digi/40002086_Z.src.rpm

Install the drivers:

rpm -Uvh /usr/src/redhat/RPMS/x86_64/dgrp-1.9-39.x86_64.rpm

OR

rpm -Uvh /root/rpmbuild/RPMS/x86_64/dgrp-1.9-39.x86_64.rpm

Edit udev to set permissions for tty devices:

vim /etc/udev/rules.d/10-dgrp.rules

Locate the “tty_dgrp” entry, and modify it as displayed below:

KERNEL=="tty_dgrp*", PROGRAM="/usr/bin/dgrp_udev %k", NAME="%c", GROUP="lp", MODE="0666", OPTIONS="last_rule"

Adding Digi Ports to Linux

If this is a new Digi, setup the ports in the following manner:

dgrp_cfg_node init (ttyid) (ip_address) (number_of_ports)

Example (change the IP address and number of ports to match your device):

dgrp_cfg_node init D 192.168.100.111 1

Starting the Digi Service

When the drivers have been installed, and the ports have been configured, start the Digi service to activate the serial ports:

service dgrp_daemon restart

Adding Digi Ports to VSI-FAX

If you are configuring VSI-FAX for the first time, or if you’re adding a new fax modem to your environment, you’ll need to make VSI-FAX aware of the new modem’s serial port location. For example, to create a new modem called modem1 at the serial port location /dev/ttyD00:

vfxadmin device -a -d -v /dev/ttyD00 modem1

After adding the modem to VSI-FAX, you will also need to add the modem to the default fax “pool” or class. To add the new modem1 to the default fax “pool” named fax1:

vfxadmin class -d -a modem1 fax1

How do I manage Linux print queues?

View a step-by-step screencast of this process:

To administer print jobs, first log into the server as root before running any of the following commands.

UniVerse Spooler Commands

  • To view the status of a UV print queue:
usa -p lp1
  • To enable a UV print queue:
usa +o -p lp1
  • To manually start the UV spooler:
cd /u2/uv
bin/usd /usr/spool/uv -t
    • To cancel print jobs from the UV Spooler:

For a specific job number:

usm -k 12345

For an entire queue:

usm -k -p lp1

Linux (CUPS) Spooler Commands

  • To view the status of all print queues:
lpc status
  • To check the status of a single print queue and view a list of pending jobs:
lpc status lp1
lpstat -P lp1
lpstat -plp1
  • To remove a single print job:
cancel lp1-1234
  • To remove all print jobs in a queue:
cancel -a lp1
  • To enable  a queue:
cupsenable lp1
  • To disable a queue:
cupsdisable lp1
  • To enable all queues:
lpstat -p | grep disabled | awk '{print $2}' | xargs cupsenable
  • To print a test job:
echo test | lpr -P lp1
  • To restart/refresh the cups service:
service cups restart

Resources