Fax on Demand

Eclipse recommends Esker’s Fax on Demand service for outbound faxing from Eclipse. ((Incoming faxes to Eclipse are not supported. Please use the manual procedure for uploading logos and append documents.))

What is Fax on Demand?

Fax on Demand is an Internet-based faxing service that doesn’t require any modem hardware or fax lines. Your faxes are sent via the Internet to Esker’s data centers, where they are transmitted to the recipient.

What are the benefits to using Fax on Demand?

The primary benefits are:

  • No hardware requirements, which is perfect for virtual machines and DR scenarios
  • No maintenance required, because there is no hardware to fail or fax lines to troubleshoot
  • Higher quality and reliability, because Esker uses enterprise-grade fax technology, not analog modems
  • Better scalability, so batches of faxes don’t back up the queue for hours or days

How do I receive a quote for Fax on Demand?

To receive pricing, you will first need to email a report of your fax history to Chris Graves at Esker, so that they can estimate your fax volume and provide an appropriate quote. Here are instructions for generating and sending a report to yourself that you can then forward to Esker.

Generating a fax report on AIX

Run the following commands on your AIX server, replacing the example email address with yours:

vfxolog -F csv -h on -U vsifax > /esupport/olog-output.csv
uuencode /esupport/olog-output.csv olog-output.csv | mailx -s "`hostname` Fax Report" email@company.com

Generating a fax report on Linux

Run the following commands on your Linux server, replacing the example email address with yours:

vfxolog -F csv -h on -U vsifax > /esupport/olog-output.csv
echo "" | mutt -a /esupport/olog-output.csv -s "`hostname` Fax Report" -- email@company.com

How do I enable Fax on Demand?

Please follow these instructions for enabling your new Fax on Demand account.
Disable Java Updates

Official Method

To disable automatic Java updates:

  • Change the Java update settings through the Java Control panel.
    • Windows XP: Click Start > Settings > Control Panel
    • Windows 7 and Vista: Click Start > Control Panel
  • Launch the Java Control Panel by double-clicking on the Java icon. The Java Control Panel appears.
  • Click the Update tab to access the settings.
  • To enable Java Update to automatically check for updates, select the Check for Updates Automatically check box.
  • To disable Java Update, deselect the Check for Updates Automatically check box.

Alternate Method

In some cases, customers have reported that the instructions above do not succeed at disabling automatic Java updates. In this case, please try this alternate procedure:

  • Start > Run > msconfig
  • Select the Startup tab
  • Find the entry named “Java Platform SE Auto Updater” and uncheck it
  • Apply > OK > Restart

Java security message when launching Solar

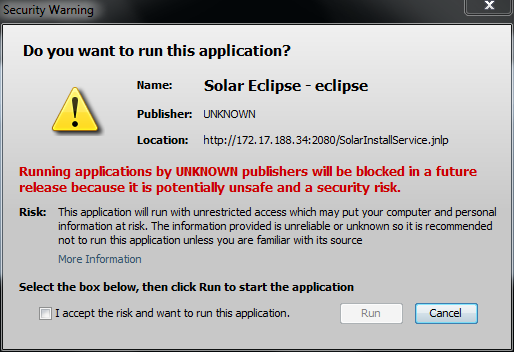
When running Solar on an Eclipse release prior to 8.7.7.05 with Java 7 Update 40, users will be presented with a security warning similar to the following:

Security Warning

To continue launching Solar, the user should select the option, I accept the risk and want to run this app. This must be done every time Solar is launched.

Here’s an explanation of the change from the Java website:

Why don’t I see the option to select “Do not show this again for this app” in the security dialog for an unsigned application?
Starting with Java 7 Update 40, the option to select “Do not show this again for this app” is no longer available. Unlike previous versions a user cannot suppress the security dialog for an unsigned application and will have to select the option, “I accept the risk and want to run this app”, each time to run the unsigned application.

The Eclipse development team will be making changes to the way future versions of Solar are signed to prevent this security dialog from appearing.

For more information, please see the Java website: http://www.java.com/en/download/help/appsecuritydialogs.xml

VMware Upgrade

There are many ways to upgrade VMware, but we recommend the following procedure for its simplicity:

  • Download and burn the ESXi installation CD/DVD (download instructions for Dell servers)
  • Insert the ESXi installer CD/DVD into the CD/DVD-ROM drive
  • Boot from the CD/DVD-ROM drive
  • At the the Select a Disk screen, select the drive on which you wish to install/upgrade VMware
  • If this is an upgrade, and the installer detects an existing installation of VMware, it will prompt you to choose from a few options:
    • Upgrade ESXi, preserve VMFS datastore: normal upgrade, keep configuration settings and VMs (this is the most common option for upgrades)
    • Install ESXi, preserve VMFS datastore: clean install, discard configuration settings, but keep VMs (this is the option you would choose if the VMware configuration is problematic, and you wish to start over)
    • Install ESXi, overwrite VMFS datastore: clean install, discard configuration settings and VMs (this is the option you would choose if you wanted to wipe the entire server and start over)
  • Press F11 to confirm your choices and start the upgrade
  • When the upgrade is complete, remove the installation CD/DVD
  • Press Enter to reboot the server

After the server has rebooted, log in via vSphere Client to verify everything is operating normally.

NOTE: In certain cases (e.g. major version changes), you will need to re-license VMware (this applies even if you are using the free vSphere license). If you fail to activate a license, your VMs will not power on after the 60 day evaluation period ends.

Resources