Using SendGrid for Eclipse Outbound Email

Overview

SendGrid is a cloud-based email delivery service. Why would you use this service, when you have an existing mail server? Well, if you’re having any one of the following issues, using this service may help:

  • Your email sent from certain addresses are being rejected (ex. Office365)
  • Your emails are being sent with a single reply-to address (ex. Google Apps, Gmail)
  • Your mail hosting provider doesn’t allow relay
  • Your emails are delivered very slowly
  • Your emails are being flagged as SPAM

There are other services similar to SendGrid available, but we can recommend SendGrid based on existing Eclipse customer feedback and our own internal testing. They offer a free plan for sending up to 200 emails per day (useful for commitment-free testing), a “pay per email” plan, and various flat-rate monthly plans.

Account Setup

To get started with SendGrid, you must first sign up for an account. For a 25% discount on any paid plans for the first three months, you may use this link, or go to sendgrid.com directly. ((To provide you with the discount, this is a referral link, but Eclipse doesn’t profit from the referral other than receiving credit towards a SendGrid, which we only use for development testing purposes. If you are not comfortable with this type of referral, please feel free to visit sendgrid.com directly and sign up for the service without the discount.))

Fill out the required information. We recommend that you generate a unique, random password, as it will be stored on your Linux server later. After you have finished signing up, SendGrid will review your account and send you an email when it has been provisioned. If you don’t receive the email, and your account dashboard still shows that your account is being provisioned, chat or email their support team to accelerate the process.

When your account has been provisioned, you’re ready to proceed with configuring your Linux server to use SendGrid.

Linux Server Configuration

If you subscribe to LTS, you may contact the Eclipse UNIX team for assistance with configuring SendGrid. Please be ready to provide your SendGrid username and password.

To configure the Linux server’s postfix MTA to relay via SendGrid, open the /etc/postfix/main.cf configuration file using any text editor, and add the following information (change the fields in red to your SendGrid username and password):

smtp_sasl_auth_enable = yes
smtp_sasl_password_maps = static:yourSendGridUsername:yourSendGridPassword
smtp_sasl_security_options = noanonymous
smtp_tls_security_level = may
start_tls = yes
header_size_limit = 4096000
relayhost = [smtp.sendgrid.net]:587

After the file has been saved, restart postfix to apply the changes:

service postfix restart

At this point, you should be able to send emails via SendGrid.

Troubleshooting

If your emails aren’t going through, check the postfix log:

tail /var/log/maillog

Note any authentication or rejection errors, and contact the Eclipse UNIX support team or SendGrid support.

If the postfix log shows successful relay, but the mail isn’t being delivered, check the SendGrid logs or contact SendGrid support.

FAQ

Q. Does SendGrid work with AIX?
A. No, because SendGrid requires SMTP AUTH and SASL, which AIX’s sendmail doesn’t support.

Q. Can I use SendGrid with Eclipse Forms or Job Management?
A. Yes, just use the Linux server’s IP address as the SMTP server, and postfix will relay all mail through SendGrid.
Setting Up a Local Attached Printer (USB)

Setting Up a Local Printer

Local printing allows you to attach a printer to a users PC, install it on their PC and allow the user to print from Eclipse as well as windows. This is not a network printer.

1. Physically attach the printer to your PC’S LPT or USB port and install the printer on your PC.

2. Login to Eclipse.

3. Select Terminal Setup from the F2-System/System Files… menu.

4. Locate your Terminal ID and place the cursor on that line. If there is not one you will need to setup a Terminal Id. This can be done by accessing the Terminal Setup screen in Eclipse. F2/F/T.

Once your ID is created, Highlight it and select ALT/S to get the Local Printer Menu


Figure 1 Local Printer Menu.

5. Under the Local Printer field hit the F10 key and select the PCL5 driver with correct amount of trays for a laser printer or Printronix for a Dot matrix printer.

6. Under the Form Loaded field hit the F10 key and select the form you desire.

  • ANY* is the most common form loaded on a local printer and means that

everything you print from Eclipse will print to your local printer even if you select another Eclipse printer..

7. Press Esc to exit the Local Printer Assignment screen and save your settings.

8. Access your Eterm Configuration screen by selecting Configure and then Communications from the grey menu bar in Eterm.


Figure 2: Configure/Communications screen.

9. Move the cursor to the ID field and type in your Terminal ID.

Note: It is important to type your User ID exactly as it appears on the Terminal Setup screen, including capitalization where appropriate.

10. Click on OK to save your changes.

11. Access the Configure/Printing menu in eterm and check off Selected Printer and then click the Select Printer tab.

This will give you the option to select the installed printer from your computers installed printers. Once selected click on OK.

Java security message when launching Solar

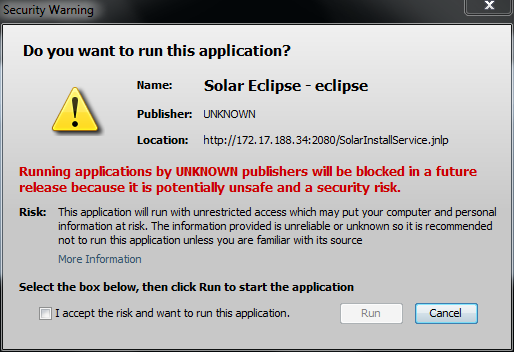
When running Solar on an Eclipse release prior to 8.7.7.05 with Java 7 Update 40, users will be presented with a security warning similar to the following:

Security Warning

To continue launching Solar, the user should select the option, I accept the risk and want to run this app. This must be done every time Solar is launched.

Here’s an explanation of the change from the Java website:

Why don’t I see the option to select “Do not show this again for this app” in the security dialog for an unsigned application?
Starting with Java 7 Update 40, the option to select “Do not show this again for this app” is no longer available. Unlike previous versions a user cannot suppress the security dialog for an unsigned application and will have to select the option, “I accept the risk and want to run this app”, each time to run the unsigned application.

The Eclipse development team will be making changes to the way future versions of Solar are signed to prevent this security dialog from appearing.

For more information, please see the Java website: http://www.java.com/en/download/help/appsecuritydialogs.xml

Install Clam AntiVirus for Linux

Note: This article is provided for informational purposes only. If you choose to install anti-virus software, our standard 3rd party software policy applies: you are welcome to install and operate 3rd party software on the Eclipse server, but Eclipse will not certify or provide technical support for any of these software products, so you must obtain technical support from the vendor or elsewhere.

Installation

Download the ClamAV packages:

yum install clamav

Install anti-virus updates:

freshclam

Scan

To initiate an on-demand scan:

clamscan --recursive --log=/tmp/clamscan.log /

To filter the results:

egrep -v "OK|Symbolic|Empty|Excluded|Permission" clamscan.log

You should see ~46 infected test files under the clamscan directory

Resources

http://sial.org/howto/clamav/
http://www.linuxmail.info/how-to-install-clam-antivirus-centos-5/
http://dag.wieers.com/rpm/packages/clamav/

Connection Pool Maintenance

Here are instructions for maintaining the pool of connections between the database and application servers.

Every night, the Eclipse software recycles the pool of database connections, except connections marked as “in use” or “reserved” by Solar sessions. You can identify these connections by their creation date: anything older than 1:00 AM was from a previous business day. It is rare for connections to be marked as “in use” or “reserved” for more than a day under normal conditions, so it’s highly likely that any leftover connections were the result of a canceled database query or a disconnected user session. These connections consume database resources and should be closed.

Step 1: Closing Connections via the Connection Pool Manager Web Page

Browse to the Solar web start page, and then click on the link for the Connection Pool Manager. You will be prompted for your Eclipse user credentials when entering the secure area.

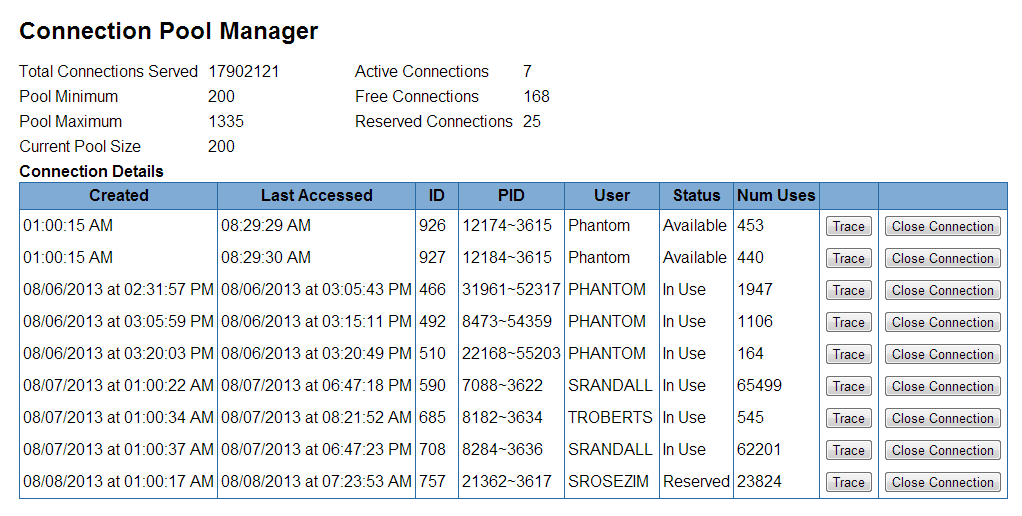
The Connection Pool Manager web page displays a table of all of the current connections between the database and application server, similar to the following example:

J2EE Phantoms 1

Before closing a connection, you may wish to review the “trace” output, which will show you the last database activity of the user’s connection. If a user shows up often, you may wish to contact them and discuss what they were doing that resulted in leftover database connections.

To close a connection, click the “Close Connection” button and wait a few seconds. The connection should disappear from the table. If it doesn’t, proceed to the next step below.

Step 2: Closing Connections from the Command Line

If you weren’t able to close a hung database connection from the web page, or if you’re looking to clean up connections from a previous application server instance that do not appear on the Connection Pool Manager web page, you may do so from the command line.

Log into the server as root, and run the following command:

ps -ef | grep SOLAR.J2EE.CONNECTION | grep -v "01:00"

This command will find any SOLAR.J2EE.CONNECTION phantoms that existed prior to the scheduled refresh at 1:00 AM. This is the quickest way to identify leftover connection phantoms.

Here’s an example of the above command being run on a server with leftover connections:

[root@eclipse ~]# ps -ef | grep SOLAR.J2EE.CONNECTION | grep -v "01:00"
eclipseB 7088 18276 0 Aug07 ? 00:07:52 phantom PHW SOLAR.J2EE.CONNECTION 192.168.59.160 51420 590
eclipseB 8182 18276 64 Aug07 ? 1-12:04:07 phantom PHW SOLAR.J2EE.CONNECTION 192.168.59.160 51420 685
eclipseB 8284 18276 0 Aug07 ? 00:05:27 phantom PHW SOLAR.J2EE.CONNECTION 192.168.59.160 51420 708
eclipseB 8473 18276 0 Aug06 ? 00:00:21 phantom PHW SOLAR.J2EE.CONNECTION 192.168.59.160 51420 492
eclipseB 21362 18276 0 Aug08 ? 00:00:37 phantom PHW SOLAR.J2EE.CONNECTION 192.168.59.160 51420 757
eclipseB 22168 18276 0 Aug06 ? 00:00:02 phantom PHW SOLAR.J2EE.CONNECTION 192.168.59.160 51420 510
root 23935 17186 0 08:43 pts/336 00:00:00 grep SOLAR.J2EE.CONNECTION
eclipseB 31961 18276 0 Aug06 ? 00:01:30 phantom PHW SOLAR.J2EE.CONNECTION 192.168.59.160 51420 466

As you can see, the query returned a number of phantoms. These can safely be terminated using the kill -4 PID command, where PID is the process ID of the phantom from the 2nd column of the output.