The Cisco VPN Client on Windows 7 with Air Cards (AT&T and Verizon)

Symptoms: Customer reports that their IPSec Client VPN solution works fine on their Windows XP machines but not their Windows 7 machines.

Potential Cause: With Windows 7, Microsoft introduced the Mobile Broadband (MB) driver model that more tightly integrates wireless modems and WWAN devices within Windows.  The changes were fairly significant and included an update to the Windows NDIS (Network Driver Interface Specification) to version 6.2.  Any network application that performs packet capture, filtering, or injection at the MAC layer (such as VPN clients) will likely have compatibility issues with the mobile broadband stack in Windows 7.  As of publication, many IPSec VPN Clients have not been updated to support NDIS 6.2.

Potential Solution: The company PC administrator can update the drivers via the Citrix website. 

ftp://files.citrix.com/dneupdate.msi for 32-bit

ftp://files.citrix.com/dneupdate64.msi for 64-bit

More Information:

Cisco Systems VPN Client Version 5.0.07.x utilizes NDIS intermediate drivers based on NDIS 5.0 that are incompatible with the WWAN adapter type released with Windows 7. The third party tool used by the Cisco VPN Client that acts as the NDIS IM driver is Citrix Deterministic Network Enhancer (DNE).

Citrix has released an update to DNE that is compatible with the Windows 7 Mobile Broadband driver model WWAN adapter (see download link above).  Installing this update resolves the compatibility issues seen with the Cisco VPN Client.  Other VPN clients that utilize DNE for their NDIS intermediate drivers may benefit from this update as well.

 Reference – http://www.citrix.com/go/lp/dne.html
Fix RHN Certificate Errors

Symptoms

You attempt to install Red Hat updates using yum, and you receive an error similar to the following:

up2date_client.up2dateErrors.SSLCertificateVerifyFailedError: The certificate is expired. Please ensure you have the correct certificate and your system time is correct.

 Fix

Remove the expired certificate and replace it with the new certificate:

rm /usr/share/rhn/RHNS-CA-CERT
wget -P /usr/share/rhn http://f.cl.ly/items/1B19031O2E0m1k3E2n3u/RHNS-CA-CERT

Update the Red Hat Network packages:

yum -y update rhn*

Cause

Red Hat’s old certificate expired in August 2013, so any server that hadn’t installed updated since the new certificate was provided in March 2010 won’t be able to validate the new packages. For more information, see this article on Red Hat’s KB.

To prevent issues like this from occurring in the future, please install Red Hat updates at least two times per year.

Fax on Demand

Eclipse recommends Esker’s Fax on Demand service for outbound faxing from Eclipse. ((Incoming faxes to Eclipse are not supported. Please use the manual procedure for uploading logos and append documents.))

What is Fax on Demand?

Fax on Demand is an Internet-based faxing service that doesn’t require any modem hardware or fax lines. Your faxes are sent via the Internet to Esker’s data centers, where they are transmitted to the recipient.

What are the benefits to using Fax on Demand?

The primary benefits are:

  • No hardware requirements, which is perfect for virtual machines and DR scenarios
  • No maintenance required, because there is no hardware to fail or fax lines to troubleshoot
  • Higher quality and reliability, because Esker uses enterprise-grade fax technology, not analog modems
  • Better scalability, so batches of faxes don’t back up the queue for hours or days

How do I receive a quote for Fax on Demand?

To receive pricing, you will first need to email a report of your fax history to Chris Graves at Esker, so that they can estimate your fax volume and provide an appropriate quote. Here are instructions for generating and sending a report to yourself that you can then forward to Esker.

Generating a fax report on AIX

Run the following commands on your AIX server, replacing the example email address with yours:

vfxolog -F csv -h on -U vsifax > /esupport/olog-output.csv
uuencode /esupport/olog-output.csv olog-output.csv | mailx -s "`hostname` Fax Report" email@company.com

Generating a fax report on Linux

Run the following commands on your Linux server, replacing the example email address with yours:

vfxolog -F csv -h on -U vsifax > /esupport/olog-output.csv
echo "" | mutt -a /esupport/olog-output.csv -s "`hostname` Fax Report" -- email@company.com

How do I enable Fax on Demand?

Please follow these instructions for enabling your new Fax on Demand account.

Disable Java Updates

Official Method

To disable automatic Java updates:

  • Change the Java update settings through the Java Control panel.
    • Windows XP: Click Start > Settings > Control Panel
    • Windows 7 and Vista: Click Start > Control Panel
  • Launch the Java Control Panel by double-clicking on the Java icon. The Java Control Panel appears.
  • Click the Update tab to access the settings.
  • To enable Java Update to automatically check for updates, select the Check for Updates Automatically check box.
  • To disable Java Update, deselect the Check for Updates Automatically check box.

Alternate Method

In some cases, customers have reported that the instructions above do not succeed at disabling automatic Java updates. In this case, please try this alternate procedure:

  • Start > Run > msconfig
  • Select the Startup tab
  • Find the entry named “Java Platform SE Auto Updater” and uncheck it
  • Apply > OK > Restart

Eclipse Mobile 3 Force HTTPS

To force Eclipse Mobile 3 users to the secure (HTTPS) version of the website, whether or not they browse to the insecure (HTTP) version of the page:

Ensure that Eclipse Mobile is accessible via both HTTP and HTTPS before continuing.

Download and install Microsoft’s URL Rewrite extension.

Make a backup copy of the Eclipse Mobile web.config file, which is typically located at C:\Eclipse\Mobile\web.config.

Add a rewrite rule to send users to the HTTPS version of the mobile site. There are two methods to accomplish this:

You may manually edit the web.config file, and add a new rule in the section between <rewrite> and </rewrite>:

<rule name="HTTP to HTTPS redirect" stopProcessing="true">
  <match url="(.*)" />
    <conditions>
      <add input="{HTTPS}" pattern="off" ignoreCase="true" />
    </conditions>
  <action type="Redirect" redirectType="Found" url="https://{HTTP_HOST}/Mobile/{R:1}" />
</rule>

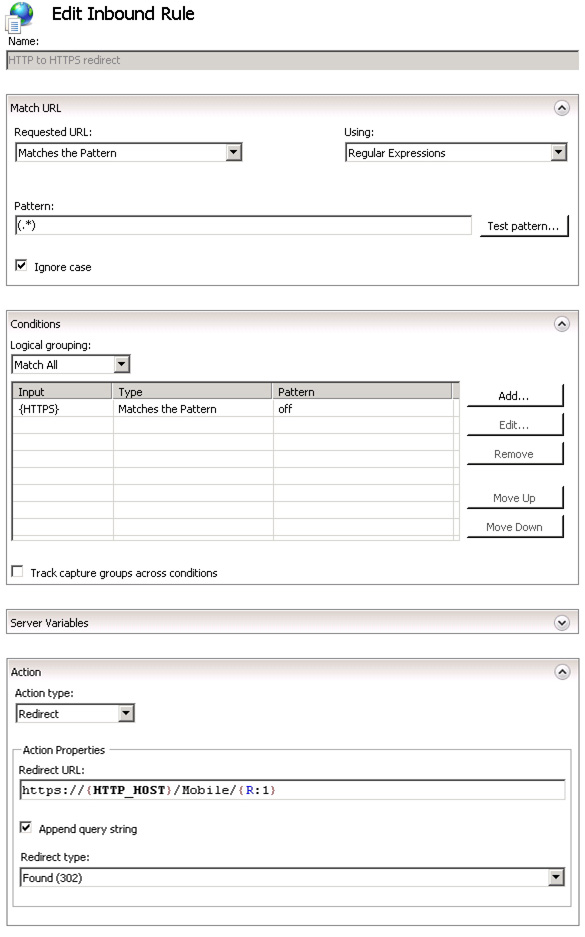
If you are not comfortable modifying the web.config file directly, you may also add the rule via the IIS Manager GUI.

Browse to Sites -> Default Web Site -> Mobile. In the features view, open URL Rewrite. Select “Add Rule”, and enter the following settings:

IIS Rewrite Rule