Basic Reinstall Procedure
If you’re having problems with Solar, it may be worthwhile to clear your cached Solar files and reinstall from the web-start link.
- Navigate to the Control Panel
- Select Java
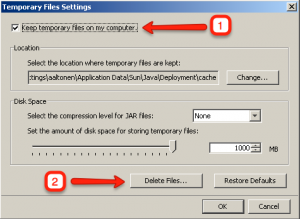
- From the Java Control Panel, click the “Settings…” button under the Temporary Internet Files section
- Verify that Keep temporary files on my computer is checked

- Choose Delete files
- Reinstall Solar using the Click Here to Install Solar link (see also: How do I install the Solar client?)
View a step-by-step screencast of this process:
Advanced Reinstall Procedure
The following procedure should be used if the above basic procedure doesn’t work:
NOTE: If you are using Windows 7, REDUCE UAC (USER ACCESS CONTROL) to the minimum setting before attempting to install solar. You may set UAC back to your desired level after solar has been installed. Ref: http://windows.microsoft.com/en-US/windows7/products/features/user-account-control
- From the Start menu, select Run
- For Windows XP, paste/type and run: %APPDATA%
- For Windows 7, paste/type and run: %USERPROFILE%\AppData\LocalLow
- In the Explorer window that opens, delete the Sun folder
- Reinstall Solar using the Click Here to Install Solar link
If Solar does not function after performing the above steps:
- Navigate to the Control Panel
- Uninstall all Java Runtime Environments
- Reboot the computer
- Install only the Java Runtime Environment available on the Solar web start page
If Solar still does not function after performing the above steps:
- Log in as Local Admin on the Desktop
- Remove the Windows User Profile where the SOLAR issues are occurring.
- Reboot, Log back in as that user, then Reinstall SOLAR