Fix Dell Cannot retrieve repository metadata Error

Symptom

When running yum update on a RHEL 5 system, the following error is shown:

http://linux.dell.com/repo/hardware/latest/platform_independent/rh50_64/repodata/repomd.xml: [Errno 14] HTTP Error 404: Not Found
Trying other mirror.
Error: Cannot retrieve repository metadata (repomd.xml) for repository: dell-omsa-indep. Please verify its path and try again

Cause

Dell discontinued support for RHEL 5 in the latest version of their yum repo, which is enabled by default, but they keep the old copies online.

Fix

Point the Dell repo at an older version:

sed -i 's/latest/Linux_Repository_14.12.00/g' /etc/yum.repos.d/dell-omsa-repository.repo

You may now re-run yum.

Solar Application Blocked by Security Settings

Problem

When launching Solar, you receive an “Application Blocked by Security Settings” error message.
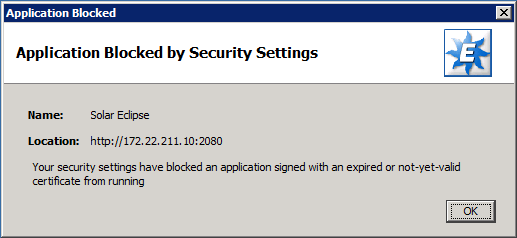
Application Blocked

Workaround

Add the Eclipse server’s IP address or hostname to Java’s security exception site list by following these steps:

Open the Java control panel:

Launch the Windows Start menu
Click on Programs
Find the Java program listing
Click Configure Java to launch the Java Control Panel ((If you can’t find the control panel, please see this Java support page for more information.))

In the “Java Control Panel” window that appears, select the “Security” tab.

If there is a “Exception Site List” section in this window, click on the “Edit Site List…” button. ((If there is no “Exception Site List” section in this window, slide the “Security Level” indicator from “High” down to “Medium” and click the “OK” button.))
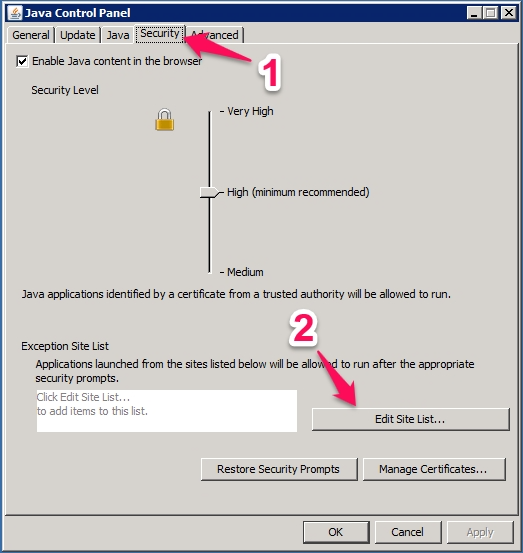
Java Control Panel Security Tab

In the “Exception Site List” window:

Click the “Add” button
Enter the Eclipse server’s web start address, including port (e.g. http://172.22.211.10:2080/).
Click the “OK” button
Confirm by clicking “OK” once again.
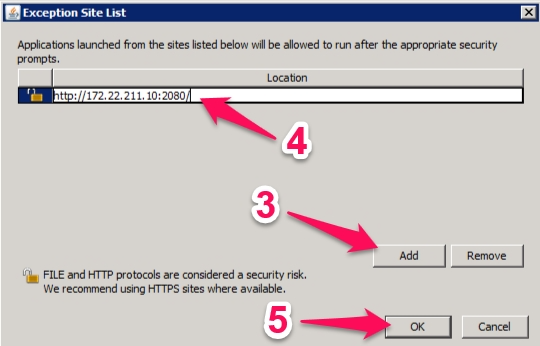
Java Exception Site List

Finally, click the “OK” button to exit the “Java Control Panel”.

Launch Solar again.

Screencast

For reference, here is a video showing the error and workaround:

[youtube=https://www.youtube.com/watch?v=pnPqgwzuObE&rel=0&showinfo=0]

FAQ

Q: Why did this error appear suddenly?
A: The certificate that was previously used to sign the Solar code expired on 10/26/15, so if you are using an older version of Solar that was signed by the expired certificate, Java’s default security settings will now block it from running.

Q: Is there a way to add an exception to the site list without using the GUI (i.e. for automating the changes across many computers)?
A: Yes, you may add the same entry to the text file located at %APPDATA%\..\LocalLow\Sun\Java\Deployment\security\exception.sites. For more information, see Java’s documentation. For information on deploying these changes via group policy, see this article for an example.

Formscape CPU Affinity

On servers with more than 2 CPU cores, Formscape may fail to license and start properly until you restrict the service process to run on 2 or fewer CPUs.

To set the CPU affinity:

  • Open the Windows services window (Start -> Run -> services.msc)
  • Right-click on the “Eclipse Forms” service and select Properties
  • Select the General tab
  • Click on the Stop button to halt the FormScape service
  • In the Start Parameters field, enter: –a “0 1”
  • Click on the Start button and then on the OK button.

How to Configure the Android VPN Client for IPsec Shared Key VPN

To use an Android device to connect to a client-to-site IPsec VPN without having to import a certificate, use shared key authentication. Your device must use Android version 4.0 or above.

Configure the Android VPN Client

  1. On the Android device, tap Settings.
  2. In the Wireless & Networks section, tap More.
  3. Tap VPN.
  4. Add the VPN by tapping the plus sign (+) next to VPN.
  5. On the Edit VPN profile page, configure these settings:
    • Name – Enter a name for the VPN connection (e.g., IPsecWithSharedKeys).
    • Type – Select IPSec Xauth PSK.
    • Server address – Enter the network address for the VPN service (e.g., 62.99.0.51).
    • IPSec identifier – Enter the group policy name that you entered for the IPsec PSK VPN on the Barracuda Firewall (e.g., IPsecVPN).
    • IPSec pre-shared key – Enter the PSK.
      android_keys_01.png

Connect to the VPN with the Android Device

After configuring the Android device, you can connect to the IPsec VPN.

  1. On the device, navigate to the VPN screen.
  2. Tap the name of the VPN that you want to connect to (e.g., IPsecWithSharedKeys).
    android_keys_02.png
  3. Enter your Username and Password, and then tap Connect.
    IPsecPSKAndroidUserPasswordPrompt.png

How do I default or reset a Cisco router?

Please see the regular process to reset the password on 1841 Router below,

  • Connect the console cable to Router 1841
  • Use the power switch in order to turn off the router, and then turn the router back on
  • Press Break on the terminal keyboard within 60 seconds of power up in order to put the router into ROMMON
  • Type confreg 0x2142 at the rommon 1> prompt in order to boot from Flash

This step bypasses the startup configuration where the passwords are stored

  • Type reset at the rommon 2> prompt.

The router reboots, but ignores the saved configuration.

  • Type no after each setup question, or press Ctrl-C in order to skip the initial setup procedure.
  • Type enable at the Router> prompt.
  • You are in enable mode and should see the Router# prompt
  • Type erase start at the Router> prompt.
  • Type configure terminal.
  • Type config-register #config-register 0x2102
  • Type write memory 
  • Type reload

– See more at: https://supportforums.cisco.com/discussion/11607366/how-reset-cisco-router-1841-password#sthash.keYSGsUX.dpuf