How do I authorize UniVerse on AIX?

To authorize UniVerse on AIX:

  • Log out all Eclipse users from Eterm.
  • Login to Eterm as root.
  • Stop Eclipse SYSTEM.ADMIN, JBoss and the UV database:
/u2/eclipse/modules/bin/services.sh -k -d all
/etc/uv.rc stop
  • Update the UV authorization (replace [Install SN#] and [Auth Qty] with the numbers from the Rocket|U2 license change confirmation email)
cd /u2/uv
bin/uvregen -s [Install SN#] -u [Auth Qty]
bin/uvregen -C
  • If the above commands do not produce a 35-digit code, you can force the code to appear by changing the user count by 1 and then back.  Example, it you have 100 users, try:
    bin/uvregen -u 99
    bin/uvregen -u 100  (note this configuration code)
  • Note the resulting configuration code for the next step.
  • Open the U2TC authorization website: https://u2tc.rocketsoftware.com/authprod.asp
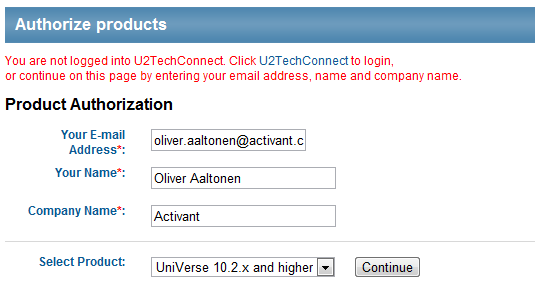
  • Fill out the first page with your contact information and select UniVerse 10.2.x and higher and press Continue:
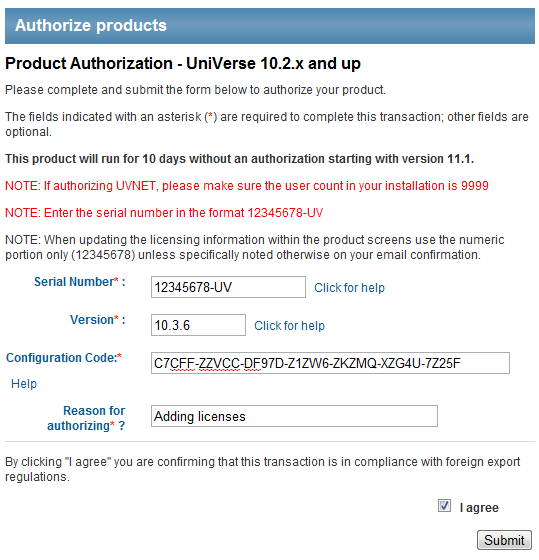
  • Fill out the next page using the information from the Rocket|U2 license change confirmation email and the configuration code from the previous steps, then press Submit. Here’s an example:
  • Note the authorization code given on the confirmation page.
  • On the Eclipse server, authorize UV (replace [authorization code]) :
bin/uvregen -A [authorization code]
  • You may confirm your license count by running the following command:
bin/uvregen -z
  • Start the UV database, Eclipse SYSTEM.ADMIN, and JBoss:
/etc/uv.rc start
/u2/eclipse/modules/bin/services.sh -e all

Reference:

How to Authorize UniVerse 10.2.0 and higher

Screencast:

Before you begin, it may be helpful to watch this short video, which goes over the entire process from start to finish:

How do I authorize UniVerse on Linux?

To authorize UniVerse on Linux:

  • Log out all Eclipse users.
  • Login to the server as root.
  • Stop Eclipse SYSTEM.ADMIN, JBoss and the UV database processes:
service eclipse-jboss stop
service monit stop
service eclipse-system-admin stop
pkill -4 -f phantom
pkill -4 -f uv
service uv.rc stop
  • Update the UV authorization (replace [Install SN#], [Auth Qty] and [Expiration Date] with the numbers from the Rocket|U2 license change confirmation email)
cd /u2/uv
bin/uvregen -s [Install SN#] -u [Auth Qty] -e [Expiration Date]
bin/uvregen -C
  • Note the resulting configuration code for the next step.
  • Open the U2TC authorization website: https://u2tc.rocketsoftware.com/authprod.asp
  • Fill out the first page with your contact information and select UniVerse 10.2.x and higher and press Continue:
  • Fill out the next page using the information from the Rocket|U2 license change confirmation email and the configuration code from the previous steps, then press Submit. Here’s an example:
  • Note the authorization code given on the confirmation page.
  • On the Eclipse server, authorize UV (replace [authorization code]) :
bin/uvregen -A [authorization code]
  • You may confirm your license count by running the following command:
bin/uvregen -z
  • Start the UV database, Eclipse SYSTEM.ADMIN, and JBoss:
service uv.rc start
service eclipse-system-admin start
service monit start
service eclipse-jboss start

Reference:

How to Authorize UniVerse 10.2.0 and higher

Screencast:

Before you begin, it may be helpful to watch this short video, which goes over the entire process from start to finish:

Unable to display content. Adobe Flash is required.

How do I change the DRAC root password?

Step by step for iDRAC6:

  • Log in as root
  • Select Remote Access from the left-hand menu
  • Select the Network/Security tab
  • Select the Users tab
  • Click the number “2” hyperlink in the User ID column
  • Select Configure User and click Next
  • Select Change Password and fill out the following password fields
  • Click Apply

Screencast for iDRAC6:

Step by step for DRAC 5:

  • Log in as root
  • Select Remote Access from the left-hand menu
  • Select the Configuration tab
  • Select the Users tab
  • Click the number “2” hyperlink in the User ID column
  • Select Configure User and click Next
  • Select Change Password and fill out the following password fields
  • Click Apply Changes

Screencast for DRAC 5:

How do I schedule a cron job in Linux?

To schedule a cron job, type the following command at the UNIX / Linux shell prompt to edit the crontab file:

 crontab -e

The format for cronjobs is:

+---------------- minute (0 - 59)
 |  +------------- hour (0 - 23)
 |  |  +---------- day of month (1 - 31)
 |  |  |  +------- month (1 - 12)
 |  |  |  |  +---- day of week (0 - 6) (Sunday=0 or 7)
 |  |  |  |  |
 *  *  *  *  *  command to be executed

How do I contact Formscape support?

You may contact Bottomline directly for Formscape support using one of the following methods:

Please have your company name and license number available. The license number can be obtained from your Formscape server’s web administration page (http://formscapeserver:24500).