Solar Website Security Certificate Warnings

When browsing to a secure portion of the Solar web start page (Session Manager, Connection Pool, etc.), you will receive an error similar to the following:

“There is a problem with this website’s security certificate. The security certificate presented by this website was issued for a different website’s address. Security certificate problems may indicate an attempt to fool you or intercept any data you send to the server. We recommend that you close this webpage and do not continue to this website.”

The warning is expected, and can be safely ignored. Regardless of any warnings, all web traffic over HTTPS between the client and application server is fully encrypted.

The way certificates work in regards to web browsing is as follows: the web browser notices there is an HTTPS connection and attempts to verify the certificate given against both the certificate authority that signed the certificate, as well as the FQDN of the destination address.

In this case, the web browser sees that the certificate is signed by a non-trusted authority, and that the destination’s IP address doesn’t appear in the certificate. This warning will always appear, because Eclipse signs our own certificates and does not customize them for each customer. To remove the warning, each customer would have to generate a certificate from a trusted authority (i.e. VeriSign) for each unique web address. Each of these certificates would have to be re-integrated with each change to the application server (i.e. point upgrade). Eclipse has weighed the warning vs. the practicality of doing this for every customer and chose to self-sign a generic certificate to provide encryption without authentication. This is an industry standard practice for secure websites on a company Intranet where a server’s identity is known.

If a customer wishes to order and install their own security certificates, they may do so at their own expense and without support from Eclipse.
How do I use uvbackup to validate my database files?

To verify the integrity of your database files, you can run what is commonly referred to as a “dummy backup” using uvbackup. This utility goes through the motions of a backup without actually saving anything. This forces all file groups to be touched, thereby triggering a file corruption message if a corrupt file is encountered.

To verify a single file, provide the path to the file:

find /u2/eclipse/PRODUCT -print|uvbackup -limit 1 -f -v -notag - >/dev/null

To verify an entire database, provide the path to the live or restored database directory (i.e. /u2/eclipse, /mnt/rd1000/rsync/backup-20120130.2000/u2/eclipse):

find /u2/eclipse -print|uvbackup -limit 1 -f -v -notag - >/dev/null

References:

Testing Printer Driver Performance Using Formscape

Preparing for Testing

Download TestHandles.fsp: http://cl.ly/DdNr/TestHandles.fsp

Double-click to launch Eclipse Forms Designer

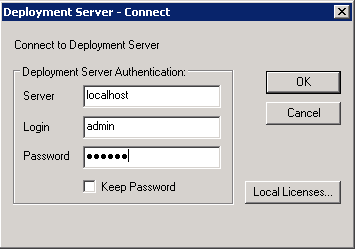
If this is your first time using the Designer, you will need to enter your server name (localhost) and credentials

If you are not licensed for Designer, you will need to contact Eclipse support for a temporary license.

Testing for Performance or Resource Leaks

Here’s the procedure for testing for resource (i.e. handle) leaks. The same procedure may be followed to test for general performance (i.e. CPU, memory utilization) by monitoring the appropriate resources in taskmgr or Process Explorer.

Launch the task manager (Start → Run → taskmgr → OK)

Go to the “Processes” tab

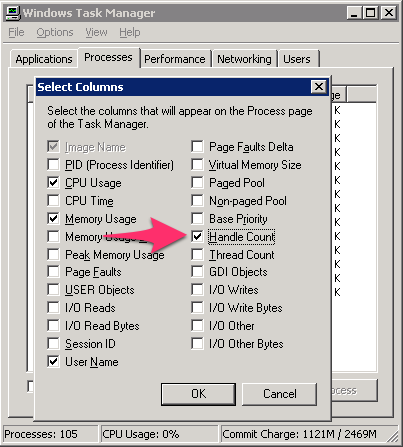
Select “View” → “Select columns…”, verify that “Handle Count” is selected, and press OK

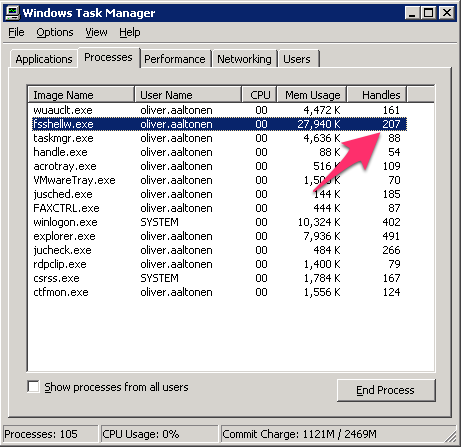
Locate the “fsshellw.exe” process and note its current handle count

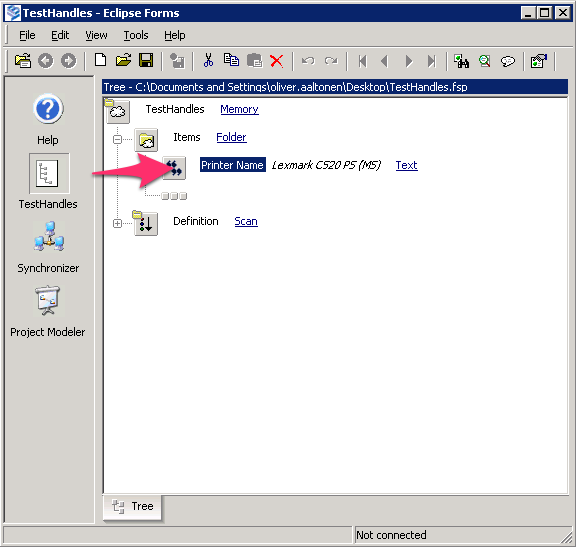
Back in Designer, click the “” icon next to “Printer Name”

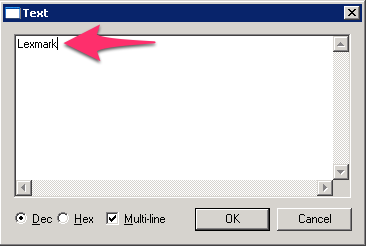
Enter the name of the printer to be tested, and press OK

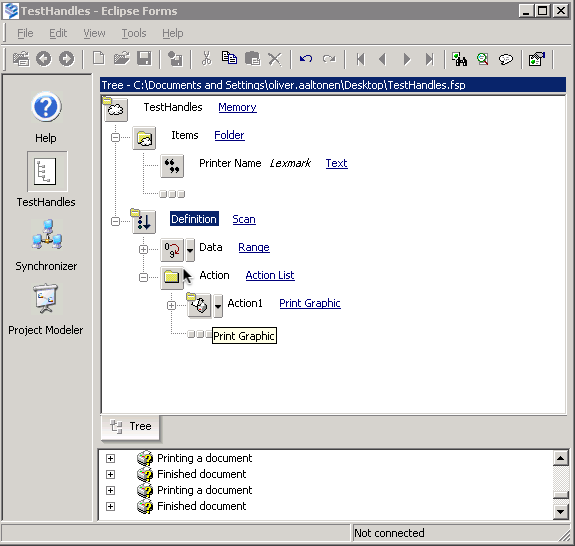
If you would like to test more pages than the default 100, expand “Definition”, click the icon next to “Data”, enter the desired number of pages to “print” for testing in “The number to end the loop at” box, and press OK

Right-click the “Definition – Scan” button, and select Run

While the process is running, you will see activity in the bottom pane

After the process has completed, take note of the handle count for the “fsshellw.exe” process

The number of handles should not have increased substantially. If the print driver has a handle leak, this number will continue to grow as more test pages are “printed”.

Where can I purchase a USB modem?

MultiTech has discontinued the only USB modem that works with VSI-FAX, but the working MT5634ZBA-USB model is still available elsewhere. We suggest starting with an eBay search, which has worked well for a number of customers seeking replacement modems in a pinch. All of the typical eBay caveats apply (i.e. purchase from a reputable seller, make sure there’s a return policy, verify the warranty status, etc.).

Please note that while the model numbers are similar, this is not the same modem as the newer MT5634ZBA-USB-V92 model, which is not certified for use with VSI-FAX on Linux.

How do I find the block size of my database files on Linux?

First, find the block size of your filesystem. On Linux, the default block size for an ext3 filesystem will be 4096 bytes (4 KB):

[root@firestorm ~]# tune2fs -l /dev/datavg/eclipse
tune2fs 1.39 (29-May-2006)
Filesystem volume name:   /u2/eclipse
Last mounted on:          
Filesystem UUID:          996f19ea-80da-477d-b961-2873ebe8181b
Filesystem magic number:  0xEF53
Filesystem revision #:    1 (dynamic)
Filesystem features:      has_journal ext_attr resize_inode dir_index filetype sparse_super large_file
Default mount options:    (none)
Filesystem state:         clean
Errors behavior:          Continue
Filesystem OS type:       Linux
Inode count:              1310720
Block count:              5242880
Reserved block count:     262144
Free blocks:              2651137
Free inodes:              1125318
First block:              0
Block size: 4096 
Fragment size:            4096
Reserved GDT blocks:      1022
Blocks per group:         32768
Fragments per group:      32768
Inodes per group:         8192
Inode blocks per group:   512
Filesystem created:       Fri Sep 23 22:04:10 2011
Last mount time:          Mon Jan  9 13:03:16 2012
Last write time:          Tue Jan 17 13:41:40 2012
Mount count:              8
Maximum mount count:      20
Last checked:             Fri Sep 23 22:04:10 2011
Check interval:           15552000 (6 months)
Next check after:         Wed Mar 21 22:04:10 2012
Reserved blocks uid:      0 (user root)
Reserved blocks gid:      0 (group root)
First inode:              11
Inode size:		  256
Journal inode:            8
Default directory hash:   half_md4
Directory Hash Seed:      e4114643-fdd7-446d-ae9c-4bdea1063657
Journal backup:           inode blocks

Each UniVerse database file has its own setting for block size, which can be found by running the ANALYZE.FILE command from TCL, as in the example below:

>ANALYZE.FILE PRODUCT
File name                               = PRODUCT
File type                               = 18
File style and revision                 = 64BIT Revision 12
Number of groups in file (modulo)       = 30427
Separation = 4 
Number of records                       = 155092
Number of physical bytes                = 70756352
Number of data bytes                    = 52605264

Average number of records per group     = 5.0972
Average number of bytes per group       = 1728.9008
Minimum number of records in a group    = 2
Maximum number of records in a group    = 7

Average number of bytes per record      = 339.1875
Minimum number of bytes in a record     = 176
Maximum number of bytes in a record     = 2424

Average number of fields per record     = 110.3191
Minimum number of fields per record     = 108
Maximum number of fields per record     = 194

Groups   25%     50%     75%    100%    125%    150%    175%    200%  full

Multiply the separation by the filesystem block size for the database file block size. In this example, 4096 bytes * 4 = 16484 bytes (16 K).